Ortur Company
The company was founded in 2018 and is a high-tech manufacturer focused on developing diode laser engravers and founded by a group of passionate engineers. The company is based in China and retails products around the globe. The company describes itself as a progressive company with a commitment to ongoing R&D.
Ortur provided the Laser Master 3 for this review at no cost. However, this review will remain impartial. Ortur has clearly stated the review blog is without influence from the company or their associates.
Ortur Laser Master 3
The Ortur Laser Master 3 is a compact laser engraving machine. It’s suitable for those who want to get started with laser engraving but don’t want to invest large sums of money. The Ortur Laser Master 3 comes with a 10W laser module, which is powerful enough to handle tasks related to engraving and cutting.
Features of Ortur Laser Master 3:
- Power System: 24V 4Amp
- Engrave Area: 400mm x 400m
- Construction Material: 70% Aluminium, 15% Stainless Steel, 5% plastic, 5% Brass, 5% Others
- Maximum Engraving Speed: 20000mm/min
- Overall dimensions: 580 x 550 x 105mm
- Printing Methods: 2.4G WiFi and USB
- Laser Engraver app for Phone/Tablet
- Laser: 10W LU2-10A
- Laser Features: Air Assist, Fans x 2 and Focus Arm
- Laser weight: 235g
- Laser Accuracy: 0.05 x 0.1mm
Safety Features:
Emergency Stop
Safety Key Interlock
Exposure Duration and Limitation
Active G-shock and Gyroscopic Sensor
Unboxing
The Ortur Laser Master 3 comes well packaged in a sturdy box and expanded foam.
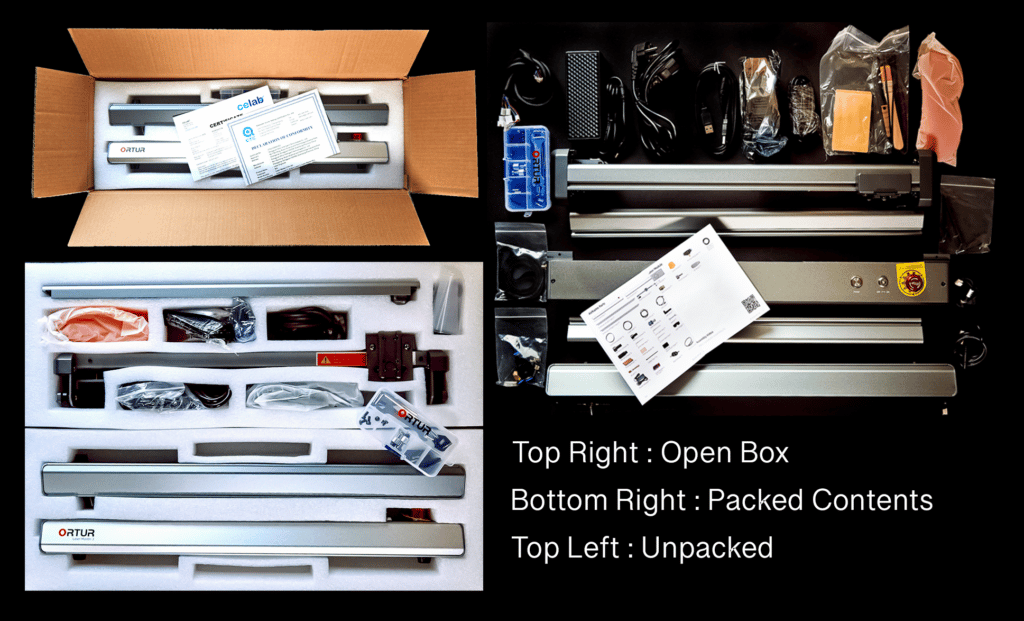
Contents:
- Front Assembly
- Rear Assembly
- Y-Axis Beam
- X-Axis Beam
- Gantry
- Allen Keys x 3
- M4* Set Screws x 2
- M4*8mm Screws x 4
- WIFI Ariel
- Idler Assembly
- Wrench x 1
- Protective Laser Goggles
- M3*6mm Screws x 2
- Drive Belts x 2
- Power Adapter
- Card Reader + TF Card
- Safety Keys
- Brush
- YRR Motor Cable
- Laser Wire
- Circuit Group Cable
- USB Cable
- Laser Module
- Laser Shield
- Air Flow Regulator
- Air Pipe Connector
- Thumb Screw
- Air Assist
- Tool Kit Box
Included Sample Pack:
- Acrylic x 1
- Testing Wood x 4
- Testing Aluminum Plate
Simple Assembly
The Ortur Laser Master 3 is very easy to assemble. It has a detailed instruction manual to guide you through the entire process. You’ll need a few tools to start, but everything is in the supplied kit. Ortur has produced a video guide that is clear, concise and understandable on how to assemble the Ortur Laser.
Notes on Assembly
The drive belts loop onto the drive shaft in the rear assembly; I found illuminating the drive shaft using a torch aids in looping the drive belts over the drive shaft cogs.
Ortur Laser Engraving Platform
Ortur also supplied their laser engraving platform to be included in the test. The platform suspends the workpiece above the bed to reduce the burning by dissipating the localised heat of the laser. The platform supplied in several pieces needs assembly, a simple process even without needing the instructions.

The laser platform is a welcomed accessory to the Ortur Laser Master 3; it proved its worth by reducing unwanted burning, and the positioning slider is a great addition. The only negative is the adjustment knobs can catch the laser head as it moves across the bed.
Laser Explorer Software
Once you have the Ortur Laser Master 3 assembled, you’ll need to install the software. The Ortur website has a user-friendly software download page that will walk you through the entire process. Ortur has developed its software called Laser Explorer for mobile devices; there are two versions of both IOS and Android.
The Laser Master app is free on both IOS and Android. Please ensure to disconnect the USB from OLM3. To establish the connection, press the power button on the laser five times in succession; it will flash different colours. Now follow the screen instructions in the app; it will take a few moments. After a successful connection, confirmation is displayed on the screen, then select the OLM3 from the list. Next, select the required settings and move the laser head into position. Pro Mode gives access to some advanced features; if you are new to the app, you can select Simple Mode. I imported an image into Laser Master, made the required adjustments, and commenced engraving.
The software has a neat feature that displays the progress of the engraving on the screen. The app notifies the user of the completion of the engraving with a pop-up box.
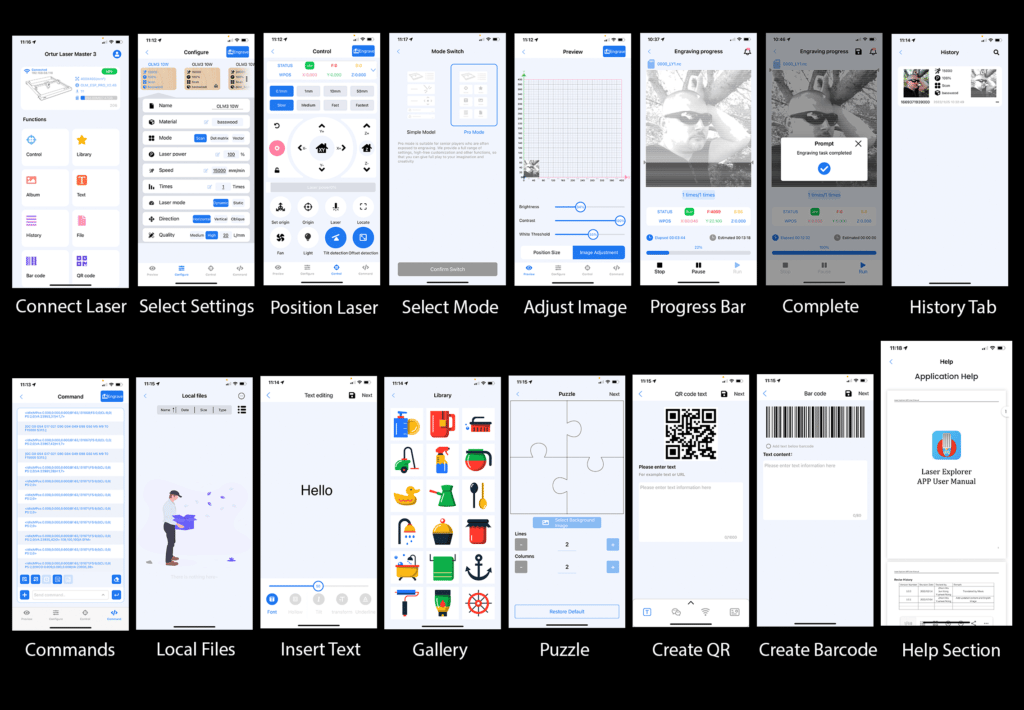
Testing with Laser Explorer
The image chosen was of my brother Marc, which has good contrast. I first converted the file to monochrome and increased the contrast levels to separate the dark and light areas.
Settings:
Image: Power 50 Speed 1000 x 1
Air Assist: YES
Result:
The image was a little faint based on the settings for Basswood in the app; my settings were an improvement, but again the image is a little faint; two passes would improve the image rendering. The wood grain of the sample is strong and detracts from the image. Please remember all settings are a guide and the results will fluctuate based on several factors, including wood moisture content, slight variations in the laser manufacture and room humidity.

Additional Laser Software
There are many free and paid software programs available for diode Lasers; the two recommended by Ortur are Laser GRBL and Lightburn, the latter being a paid version. Unfortunately, for me, Laser GRBL is not compatible with Mac OS. Lightburn is a fabulous piece of paid software available for both PC/Mac users. There is a learning curve to get the best out of lightburn; experience with photo editing software will stand you in good stead. The Lightburn software replicates many functions of Adobe Photoshop and other editing software.
Lightburn
Before using the Ortur Laser Master 3, it needs to connect to the PC/Mac. Connect the power and USB lead to the OLM3 and install the Lightburn software. Unfortunately, the Lightburn software did not recognise the OLM3: after many attempts, including restarting, unplugging and reinstallation. Lightburn failed to identify the OLM3. Finally, I installed the OLM3 manually, selecting the GRBL from the list within Lightburn and the OLM3 burst into life.
Testing with Lightburn
We have assembled several materials to test the OLM3, including the samples provided with the laser machine.
The following is a list of test materials in this review:
- 3mm Basswood – Cutting and Engraving
- Anodised Metal Business Card – Engraving
- 10mm Pine Coaster – Engraving
- Slate Coaster – Engraving
- Leather – Engraving and Cutting
- Pencil – Engraving
- Card Stock – Cutting
Test Results
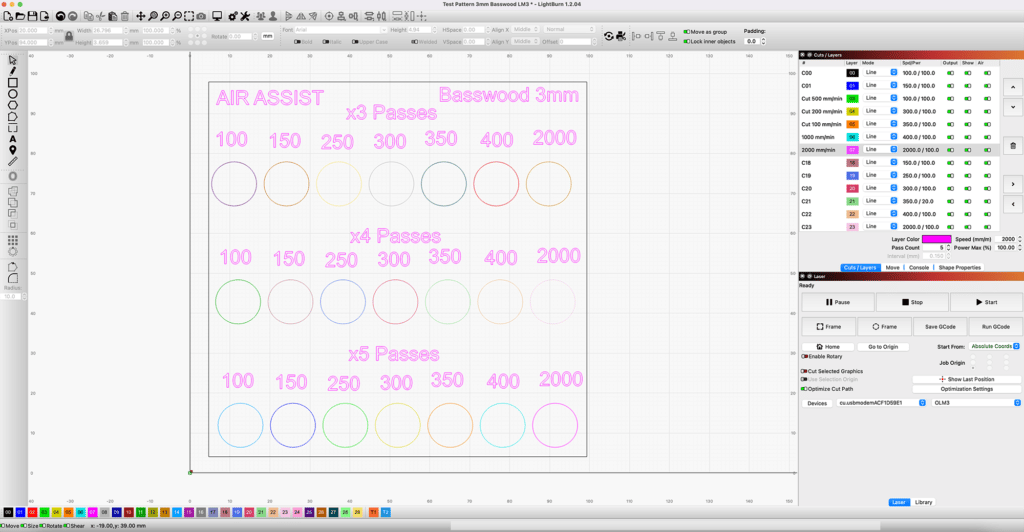
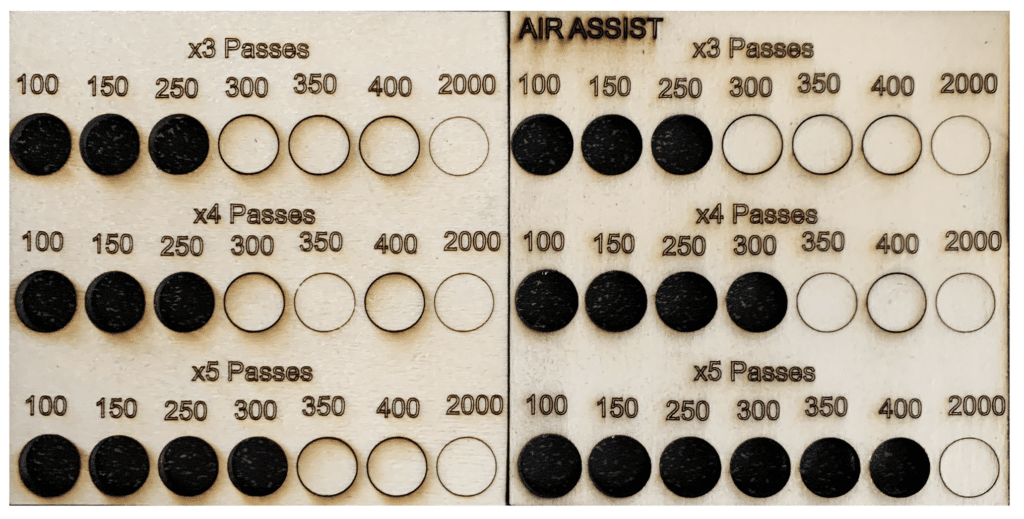
Firstly, I created a cutting test file in Lightroom, placing three rows of circles and assigning differing power levels and speeds to each. The first test was made without air assistance and repeated with air assistance.
Firstly, I created a cutting test file in Lightroom, placing three rows of circles and assigning differing power levels and speeds to each. The first test was made without air assistance and repeated with air assistance.
The test utilising air assist cut more effectively than the test with none. The resulting cuts on the test without air assistance appeared to suffer from more burning around each cut! However, the engraving of the text looks far cleaner on the non-air-assisted test sample. The Ortur Laser Master 3 cuts significantly better when air-assisted. Please see the chart below.
Basswood 3mm
With the above results in mind, I choose a Robin image to engrave and cut out of a 3mm 9x9cm piece of Basswood. I rendered the Robin as a bitmap using the fill option. I then traced the bitmap image to create an outline of the bird’s shape and deleted the bitmap. The original file was then dropped into Lightburn and overlaid within the outline.
Settings:
Image: Power 100 Speed 1700 x 1
Line: Power 100 Speed 250 x 4
Air Assist: YES
Basswood Engraving and Cutting Video
Test Result:
The Robin was rendered beautifully and the cut line was perfect. As seen in the image below, there was a slight burning near the feet, but this was on the waste wood and not on the Robins’ feet.

Anodised Metal Business Card
The metal business cards have an anodised finish. The finish is vaporised by the laser, revealing the stainless below.
Settings:
Image: Power 80 Speed 2000 x 4
Air Assist: YES
Test Result
The result was far better than I thought, especially given this is a 10W Diode laser. The edges are tack sharp, and the dragon is wonderfully rendered, even capturing the front shadow line. I was slightly off-centre when framing. The result demonstrates the capability of the Ortur Laser Master 3.

Pine Coaster 10mm
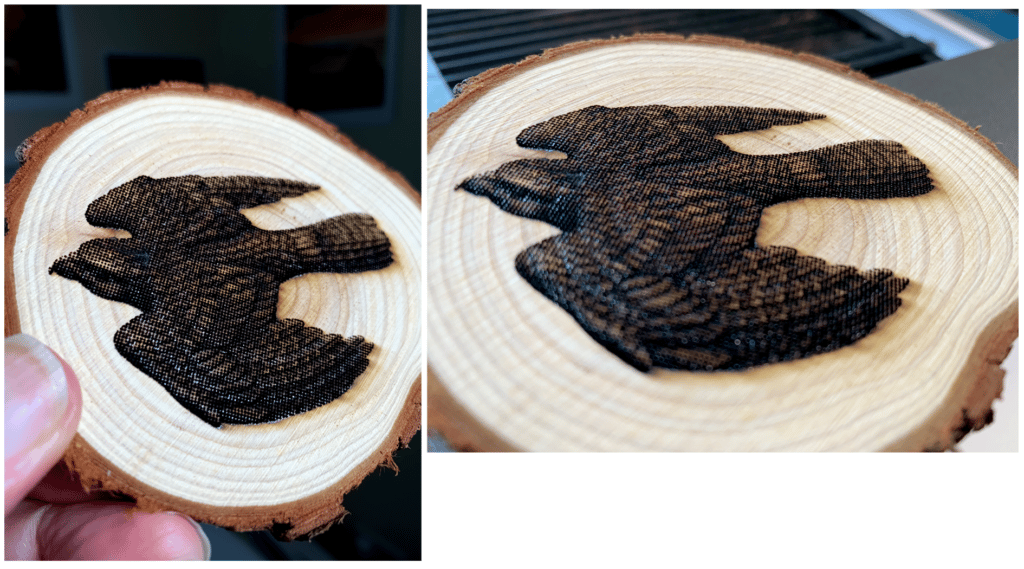
This live-edge pine coaster is 10mm thick and is untreated.
Settings:
Image: Power 80 Speed 250 x 1
Air Assist: YES
Test Result:
These results are amazing, the Falcon appears to be carved from wood. The edges of the wings catch the light beautifully and I’m blown away by the results.
Slate Coaster
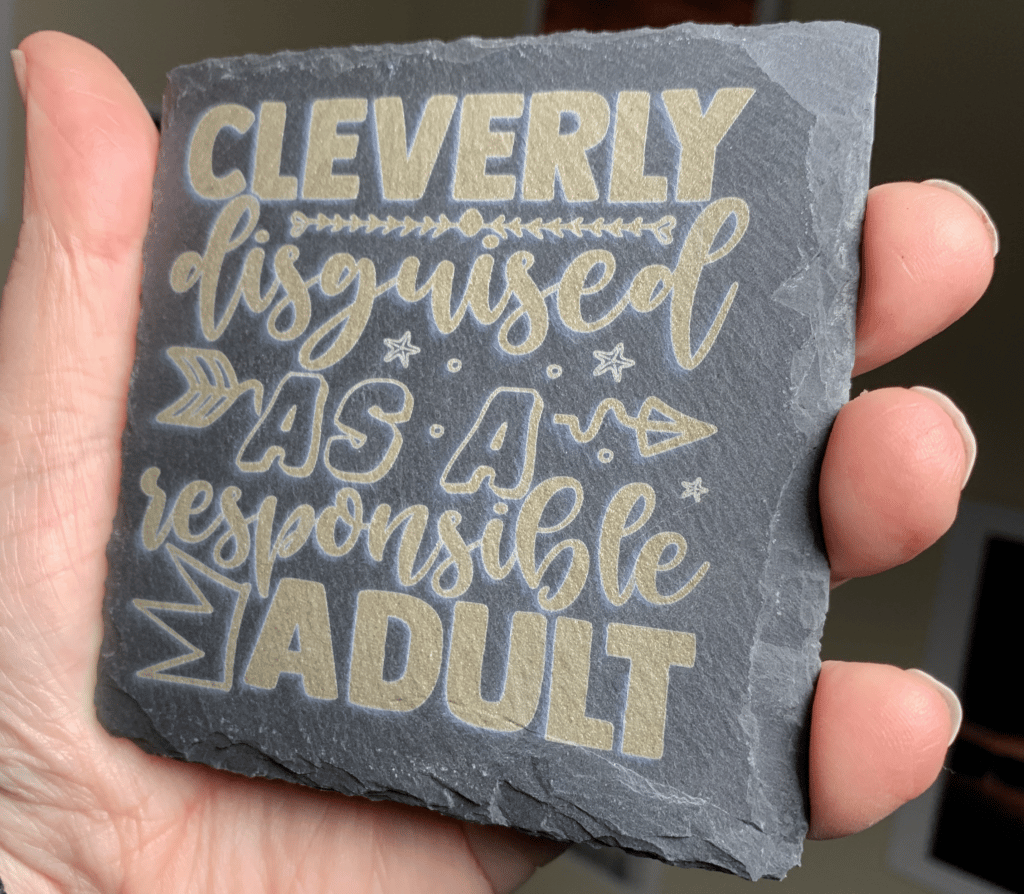
The slate coaster is 100 x 100mm, untreated and has four (4) rubber feet. The slate is solid stone and without any loose materials.
Settings:
Image: Power 60 Speed 600 x 4
Air Assist: YES
Slate Engraving Video
https://youtu.be/n3st5qA14wk
Test Result:
The OLM 3 handled the task perfectly, but the process did take some time. I would recommend testing a small sample before committing to the settings. The filled text appears gold, and highlighted text is white. I was amazed and pleased with the final result.
Leather
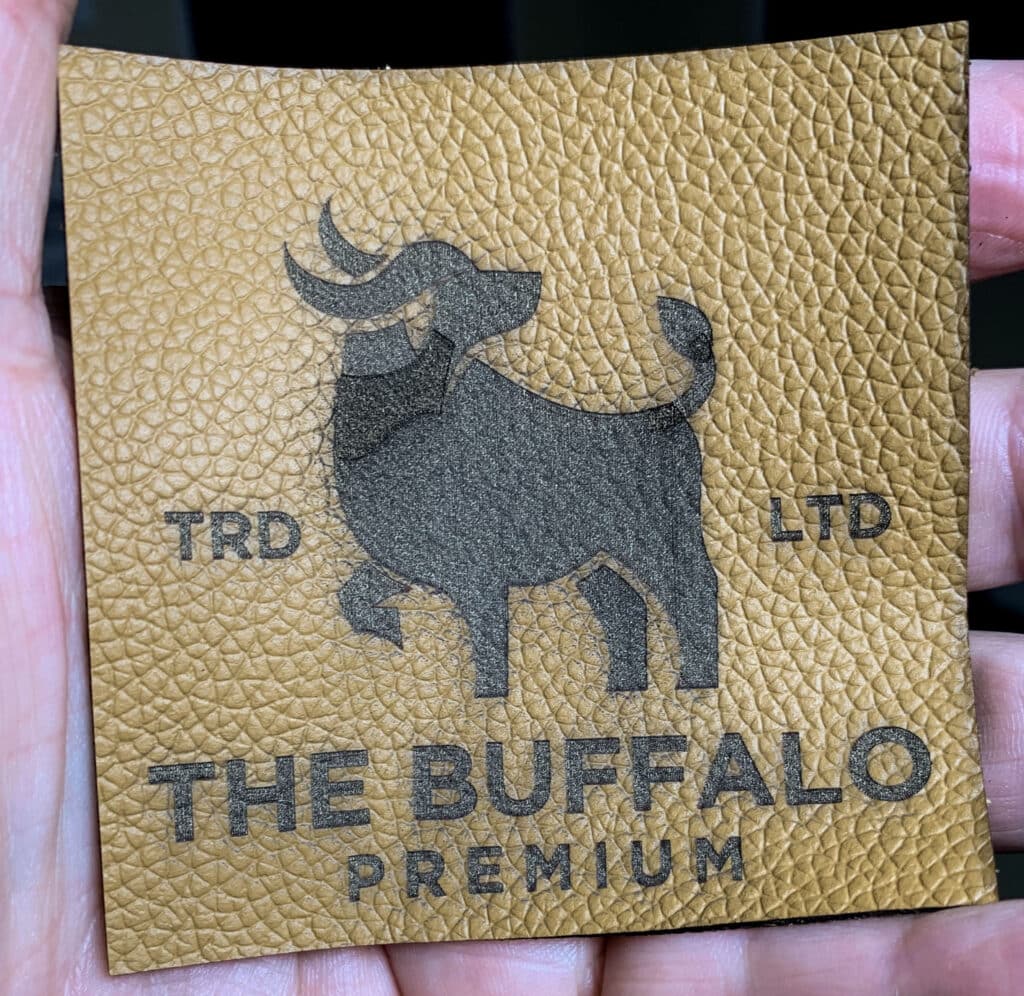
I purchased leather swatches for testing. Leather is natural, and the results may differ from sample to sample. The leather sample is 2mm in thickness and has a light brown colour.
Leather Engraving and Cutting Video
Settings:
Image: Power 80 Speed 3000 x 1
Line: Power 100 Speed 450 x 1
Air Assist: YES
Test Result:
The Buffalo logo was engraved well with no apparent over-burning or charring on the edges. I recommend having a smoke extractor or smoke filtration system; the smoke is unpleasant.
Wooden Pencil
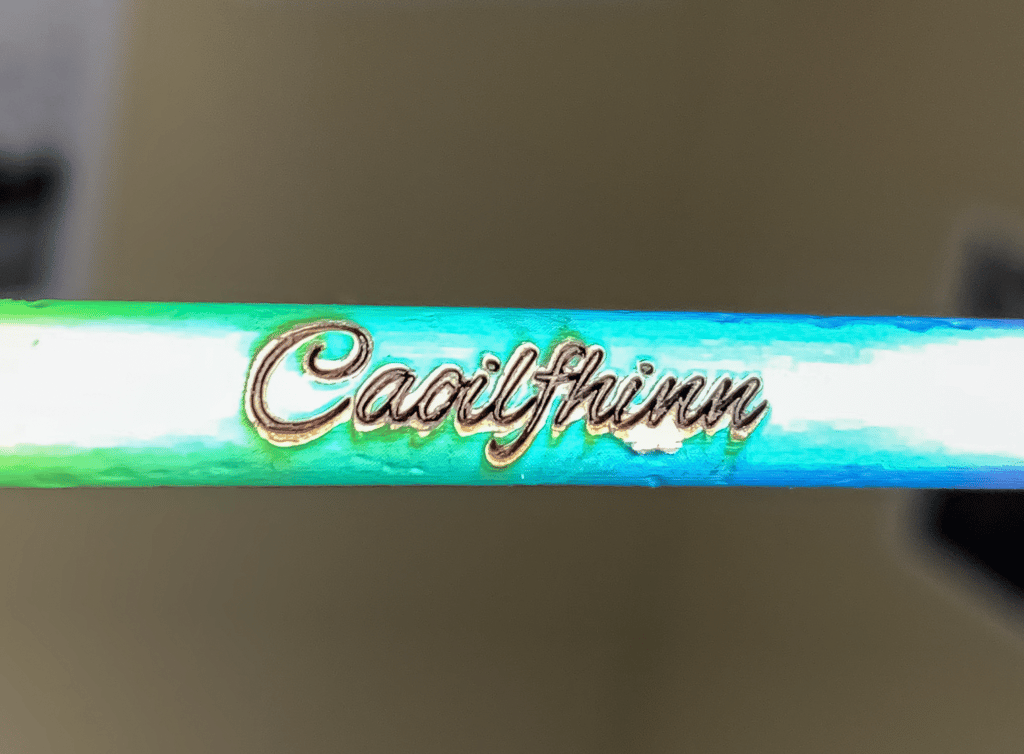
I choose one of my daughter’s pencils for the next test. The pencil is multicoloured and appears to have a coating over the wood; its width is only 6mm.
Settings:
Line: Power 100 Speed 500 x 1
Air Assist: YES
Test Result:
It proved a little tricky to align the laser with the thin pencil. I managed to align the laser, and the final results were excellent.
Card Stock
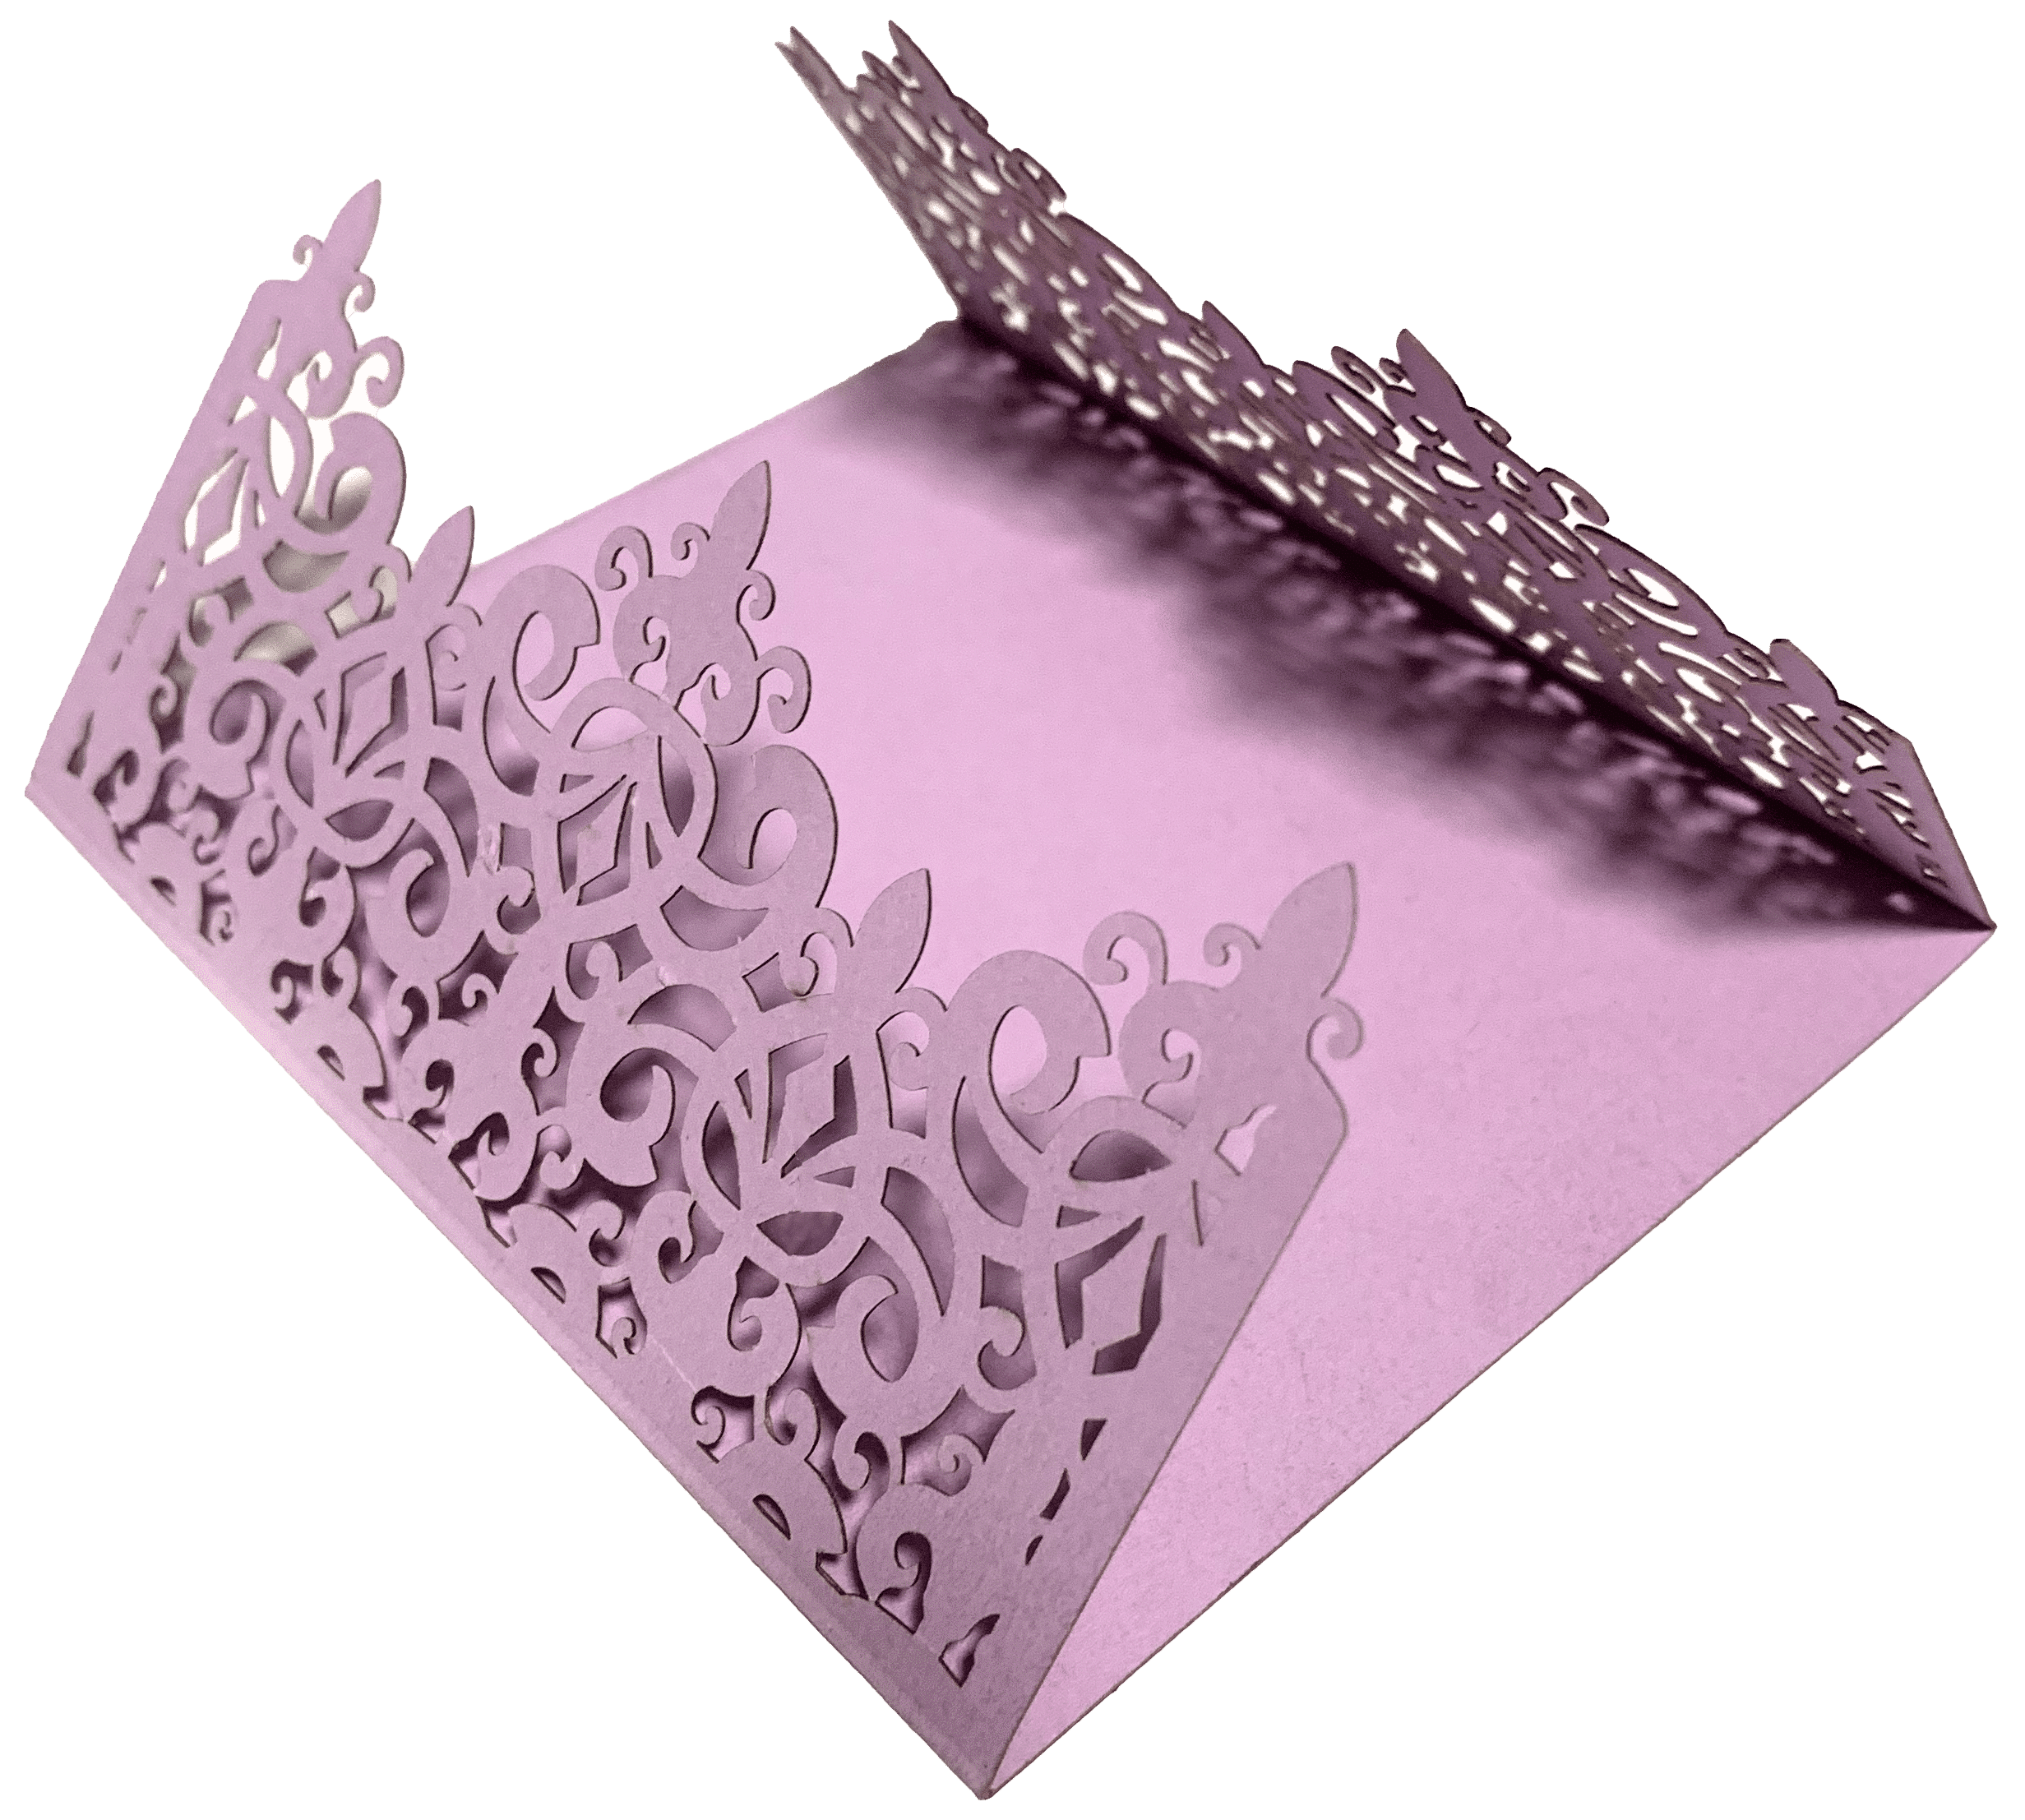
Time to try a more delicate laser-cutting project with the Ortur Laser Master 3. I selected some 270gsm card stock that I had to hand and a vector of a greeting card from Adobe stock.
Settings:
Line: Power 50 Speed 800 x 1
Air Assist: YES
Card Stock Cutting Video
Test Result:
I was pleased with the fine detail cut from the card; I had to remove a few small pieces by hand.
The Ortur Laser Master 3 has built-in safety features, including:
Emergency Stop Button
The Ortur Laser Master 3 has an emergency stop button. This emergency button will quickly stop the laser engraving process.
Safety Lock
Users must unlock the machine before being used. This safety feature prevents the laser from being operated by unauthorised personnel.

Safety Sensors
These sensors help detect potential hazards from fire and sudden movement in operation. In case of detection, the machine will automatically shut down.
Safety Guidelines in the Manual
This manual provides detailed instructions on using and maintaining the laser machine. It also includes many safety tips when operating the Ortur Laser Master 3.
Observations and Recommendations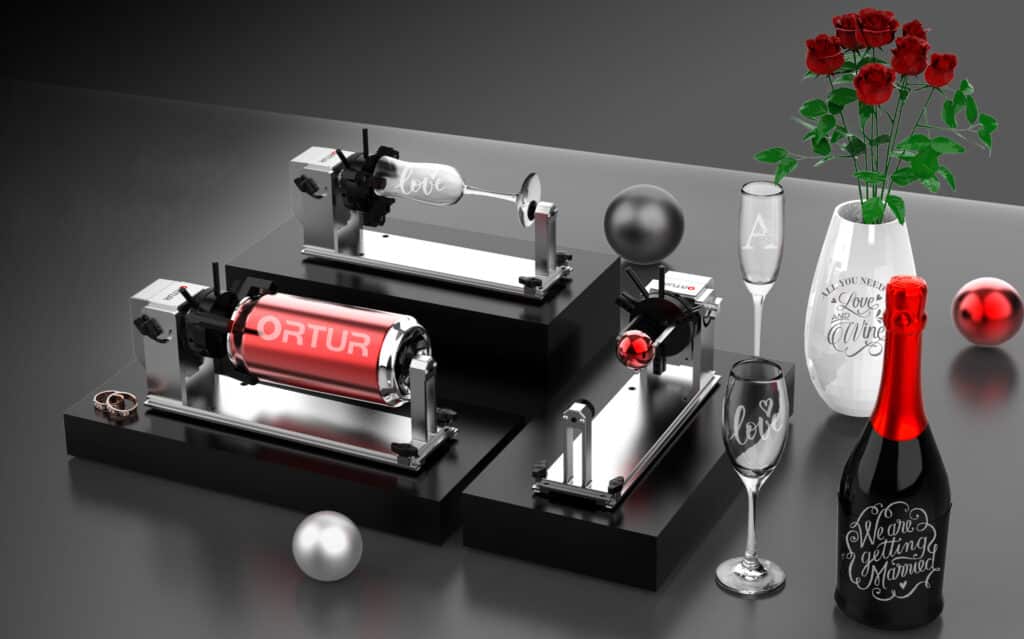
The Ortur Laser master 3 is a natural evolution from Ortur’s early models. The industrial look has given way to a more sleek design. The aluminium frame and gantry are solid; the gantry glides on steel wheels. The lockable interface and emergency button allow the machine to be locked and stopped in an emergency. However, some areas would benefit from design changes in the evolution of the Ortur Laser Master range.
The main wire bundle connected between the laser head and motherboard rest on the table and is otherwise unsupported. The wire became caught on/snagging on items sitting close to the laser. The caught wire interrupted the laser travel and caused errors on the workpiece. I understand that removing items from around the laser would have prevented the issue. However, improved cable management would eliminate the possibility of wires causing problems. I’m confident that Ortur will address the cable management issues in the natural development of the Ortur Laser Master 3.
Building the frame was easy. However, I did find aligning the frame’s screw holes hit and miss, probably due to the high engineering tolerances.
The supplied SD card requires installation at the rear of the front frame, and the card slot is slightly too large. I found it’s possible to insert the card inside the frame missing the card slot.
Whilst the laser platform is a great accessory, take care when positioning the laser head, the raised knobs used to adjust the slider can catch the laser head.
Positives
Easy to Use
Ortur Laser Master 3 is very easy to use. It comes supplied with a user manual that will guide you through the process of using the machine. Additionally, online video tutorials can help you get started with the Ortur Laser Master 3.
High Speed
With a maximum engraving speed of 0-20000mm/s, it is one of the fastest laser engravers on the market. It also has a large engraving area (400 x 400mm), making it perfect for larger projects.
Affordable
Despite its many features and benefits, the Ortur Laser Master 3 is reasonably priced, making it an excellent value for anyone looking for a top-quality engraver on a budget.
Laser Explorer App
The user-friendly control panel makes selecting the perfect settings for your project simple, and the included software makes it easy to transfer your designs to the machine.
Engraving Area
The laser has a large engraving area of 400 x 400mm. You can purchase an engraving area extension kit. It will allow you to increase the engraving area by up to 50%. The kit includes all of the necessary hardware and instructions.
Supports a Variety of Materials
The Ortur Laser Master 3 is a versatile laser engraver and cutter for various materials. Wood, leather, acrylic, glass, rubber and more. Each material requires specific settings to get the best results. It’s essential to perform power and speed tests on the various materials before engraving and cutting to ensure the correct settings.
Durability and Build
The Ortur Laser Master 3 is built with durability in mind. The heavy-duty, lightweight construction ensures that this engraver will withstand years of use, making a sound investment for any business or hobbyist.
Cooling
When it comes to cooling, the Ortur Laser module has two fans for more effective heat dissipation. One fan is in the front of the laser, while the other is in the rear. It helps prolong the lifespan of the laser and ensures that it operates at peak performance.
Safety
The Ortur Laser Master 3 is built and designed with safety in mind. The machine includes an emergency stop button, sensors for fire and sudden movement and a safety lock to isolate and prevent unauthorised use.
Conclusions
I’m extremely impressed with the Ortur Laser Master 3, punching above its weight and price class. The available free app (Laser Explorer) works well once connected to the device. The ability to check the engraving/cutting progression on a mobile device is a superb feature. The machine worked well with the Lightburn software, but not without some issues from time to time. When the Ortur Laser Master 3 loses connection via the USB, Lightburn appears to forget it was ever connected. I had to reinstall the settings and manually reinstall the Ortur Laser Master 3.
Final Thoughts
The Ortur Laser Master 3 is a fast and easy-to-use laser with features associated with more expensive models available. I recommend having a buddy to help with the construction to ensure a smooth and uneventful build.
If you are in the market for an affordable, featured-packed, powerful laser, the Ortur Laser Master 3 is an excellent and worthwhile purchase. (see links below) Remember there are no such things as mistakes, only happy accidents.
Stephen 🙂
Ortur has just launched its Y-axis Rotary Chuck, I can’t wait to test this and the Smoke Purifier System (Watch this Space)
Discount Codes:
Affiliate Links:
- Ortur Laser Master 3 10W
- Ortur Laser Master 2 Pro S2 Laser Engraving & Cutting Machine 15,000mm/min 10W
- Aufero Laser 2
- Ortur Y-axis Rotary Chuck 1.0
- Ortur Laser Enclosure 2.0
- Ortur Laser Engraving Platform 1.0
- Ortur Air Pump
- Ortur LU2-10A Laser Head
- Ortur Smoke Purifier
- Ortur Extension Kit for Laser Master 3
- Ortur LU2-4 SF Laser Module 24v/4amp
- Ortur Metal Laser Enclosure for Laser Master 2 Pro
- Ortur LU2-4 LF Laser Module 24v/4amp
- Ortur Foldable Feet for Laser Master 3
- Ortur Extension Kit Laser Master 2 Pro Series
- Ortur Black Friday Deals
