
Introduction to the Datacolor Spyder X2 Ultra
The Datacolor Spyder X2 Ultra is a cutting-edge colour calibration tool designed to ensure accurate and consistent colour representation on your display monitor. Whether you’re a photographer, videographer, or digital artist, the Spyder X2 Ultra helps you achieve true-to-life colours and optimal visual experiences.
Datacolor Spyder X2 Explained
- The Spyder X2 is a further development of the Spyder X sensor.
- It is technically based on the Spyder X, which, compared to the Spyder 5 and all its predecessors, represents a completely new sensor development by Datacolor.
- If you are currently using a Spyder 5 (or an older model), I recommend upgrading to the new Spyder X2.
- The Spyder X2 features ground breaking colour sensor technology combined with an optical lens system, resulting in significantly higher precision and colour accuracy.
- Calibration with the Spyder X2 is much faster, taking just one to two minutes to achieve perfectly calibrated monitors.
- Compared to the Spyder X Pro and Spyder X Elite, the Spyder X2 Elite and Spyder X2 Ultra come with the newly developed Spyder X2 software that boasts a user-friendly interface.
- The Spyder X2 Ultra can even calibrate displays with brightness up to 2000 nits (cd/m²).
Spyder X2 Model Variations
- Spyder X2 Elite vs. Spyder X2 Ultra:
- The main difference between these two models lies in their brightness capacity:
- Spyder X2 Elite: Standard version.
- Spyder X2 Ultra: Allows profiling of displays with a maximum luminance of up to2000 nits, which is valuable for photographers who require super-bright monitors for tethered shooting outdoors .
**The Spyder X2 Elite can be upgraded to the Spyder X2 Ultra as your needs change.
Here’s what you need to know before diving in:
- Purpose: The Spyder X2 Ultra is all about colour perfection. It corrects colour imbalances, adjusts brightness, and ensures consistent results across different devices.
- Easy Setup: Getting started is a breeze. Simply connect the Spyder X2 to your computer, install the software, and follow the onscreen instructions. It’s like setting up a friendly digital assistant for your display.
- Calibration Process: The Spyder X2 Ultra measures your screen’s colours, analyses them, and creates a custom colour profile. Think of it as a personalised colour prescription for your display.
- Benefits:
- Accurate Editing: If you’re into photo editing, video production, or graphic design, the Spyder X2 Ultra ensures that what you see on your screen matches the final output.
- Consistent Viewing: Whether you’re working on spreadsheets, watching movies, or browsing the web, consistent colours reduce eye strain and enhance your overall experience.
- Print Matching: Want your prints to look just like your screen? The Spyder X2 Ultra bridges the gap between digital and physical colours.
Unboxing
The Datacolor Spyder X2 Ultra comes wonderfully packaged in a small box (14x14x8cm) Inside the box you will find a Spyder X2, you’ll find the following components:
- Spyder X2 Sensor: The heart of the calibration process, this sensor ensures precise colour measurement and correction for your monitor.
- Serial Number: Keep this handy for registration and support purposes.
- Welcome Card: This card provides essential links to software downloads and additional support resources.
- USBA Adapter: In case your computer lacks a USBC port, use this adapter to connect the Spyder X2 Ultra.
System Requirements:
Windows: Compatible with Windows 10, 11 (32/64bit). Mac: Works with macOS X 10.14, 10.15, 11 (Big Sur), 12 (Monterey), and 13 (Ventura). Monitor resolution of at least 1280×768, a 16bit video card (24bit recommended), 1GB of available RAM, and 500MB of available hard disk space.

Test Set-Up
Equipment:
ASUS ProArt Display PA279CRV Professional Monitor
The Asus ProArt PA279CRV is a 27-inch professional monitor designed for creators and productivity. Let’s explore its features:
Display Specifications:
- Panel Type: In-Plane Switching (IPS)
- Resolution: 3,840 x 2,160 (4K UHD)
- Brightness: 400 cd/m²
- Contrast Ratio: 1,000:1
- Pixel Response Time: 2 ms
- Colour Coverage:
- 99% Adobe RGB
- 99% DCI-P3
- Refresh Rate: 60 Hz
- VESA Mount Compatibility: 100 mm x 100 mm
Design and Build:
- The Asus ProArt PA279CRV features slim bezels on three sides of its 27-inch 4K panel, maintaining a clean and contemporary look.
- The stand offers extensive adjustability, including height, tilt, swivel, and rotation into portrait mode.
- Connectivity is a strong point:
- USB-C: Provides 96W power delivery for single-cable connectivity. Includes a dual-port USB-A hub.
- DisplayPort 1.4 x2: Supports display daisy chaining.
- HDMI 2.0 x2
- USB-C with 96W Power Delivery
Calibration and Colour Spaces:
Factory-calibrated colour spaces accessible via the comprehensive OSD:
- sRGB
- Adobe RGB
- DCI-P3
- 709
- 2020
HDR Support: VESA Display HDR 400 (entry-level)
Apple Mac Studio M1 Max – 32Gb Ram, OS Sonoma 14.3.1
Apple M1 Max Chip:
- CPU: 24-core CPU (16 performance cores + 8 efficiency cores).
- GPU: 76-core GPU.
- Neural Engine: 32-core.
- Memory Bandwidth: 800GB/s.
Memory and Storage:
- 32GB Unified Memory(Configurable to 64GB for M1 Max with 38-core GPU).
- 512GB SSD(Configurable to 1TB, 2TB, 4TB, or 8TB).
Display Support:
- Simultaneous support for up to five displays:
- Four displays with 6K resolution at 60Hz over Thunderbolt.
- One display with 4K resolution at 60Hz over HDMI.
Datacolor Spyder X2 Ultra - Installing Sofware
Download and Activate Software:
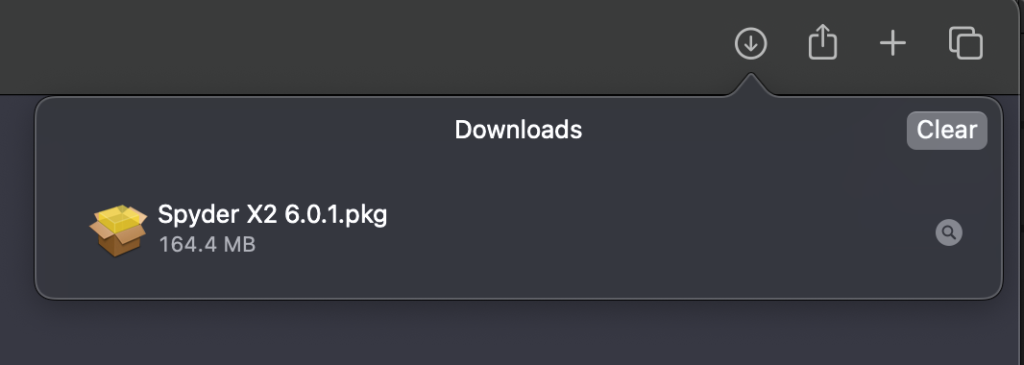
Firstly, we need to download the latest software for the Datacolor Spyder X2 and install the software.
- Download the Spyder X2 Ultra software from (http://goto.datacolour.com/getspyderx2).
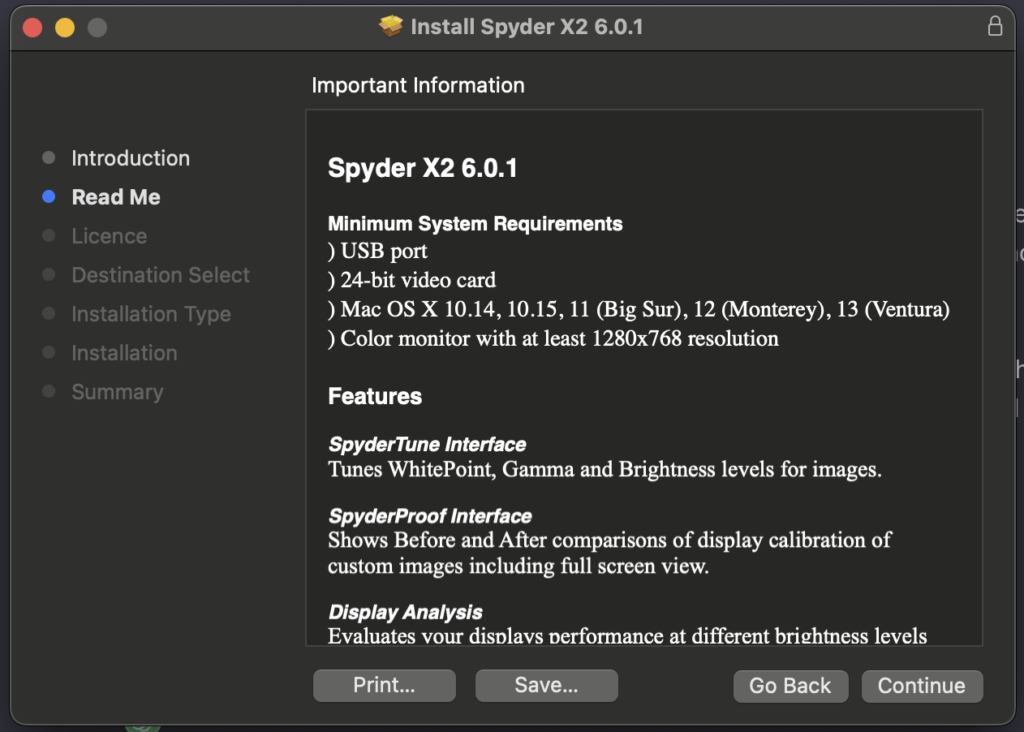
- Install the software by opening the downloaded file.
- Plug your Spyder X2 Ultra directly into a USB port on your computer (avoid using keyboard, hub, or extension cable ports).
- If your computer lacks a USBC port, use the included USBA adapter.
- The cable provides both power and communication between the Spyder X2 and your computer.
- Open the Spyder X2 application and follow the prompts to activate the software. Your serial number is located in the Spyder X2 Ultra box under the sensor.

Please ensure that the Datacolor Spyder X2 Ultra is plugged in to a usb port on the computer and NOT into a external hub; either a USB-C port or a USB-A port using the included adapter.**
Follow the on screen prompts to complete the installation process.

The following files below are installed into the chosen directory.Double click the Spyder (X2.app) icon to launch the Datacolor Spyder App.

Datacolor Spyder X2 Ultra - Configuration
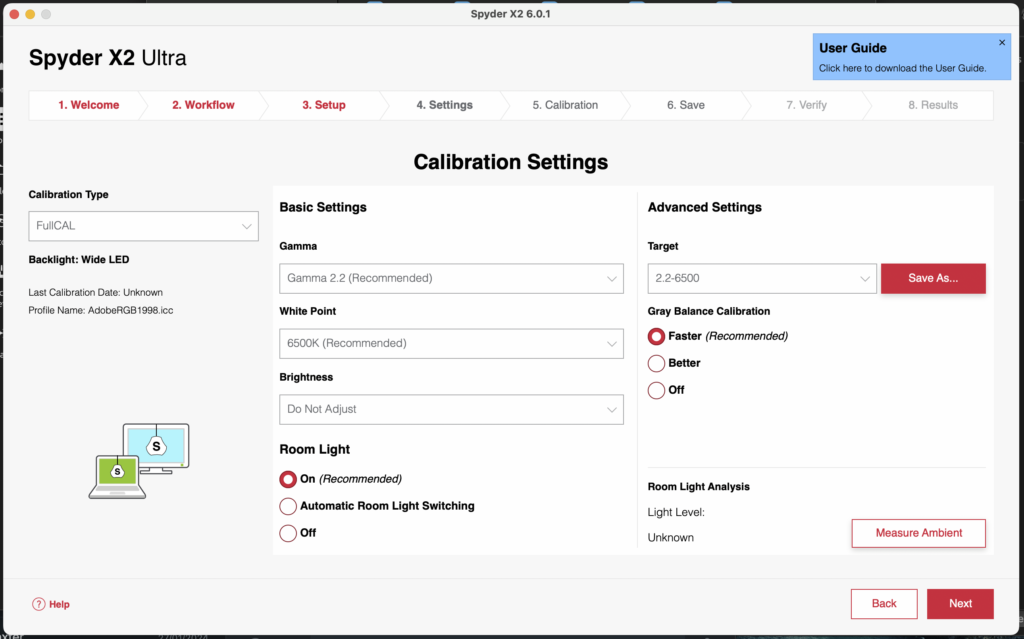
Choose the appropriate calibration type based on your needs:
- FullCAL: This performs a full calibration from scratch.
- ReCAL: Use this for recalibration.
- CheckCAL: A quick measurement to check if your existing calibration is up to date.
Gamma:
- TheGamma value defines the contrast ratio of your display view.
- Stick to the most common colour gamut’s like AdobeRGB or sRGB (Gamma 2.2) unless you have specific requirements.
White Point (Colour Temperature):
- The Kelvin value defines the white point of your display.
- 6500 Kelvin is recommended as it aligns with AdobeRGB and sRGB standards.
Brightness:
- Set the brightness value to which your display will be calibrated.
- It’s best to leave it at the recommended value and let room light measurements adjust brightness.
Room Light Compensation:
- Enable this setting to adapt brightness and contrast based on your working environment.
Choose one of the following options:
- On: Monitors ambient light levels and prompts recalibration if significant changes occur.
- Automatic Room Light Switching: Creates profiles for different ambient light levels and switches between them dynamically.
Custom Target:
- If you need a specific colour space, choose a pre-set from the dropdown.
- The calibration targets will adjust accordingly.
Datacolor Monitor - Precision Calibration
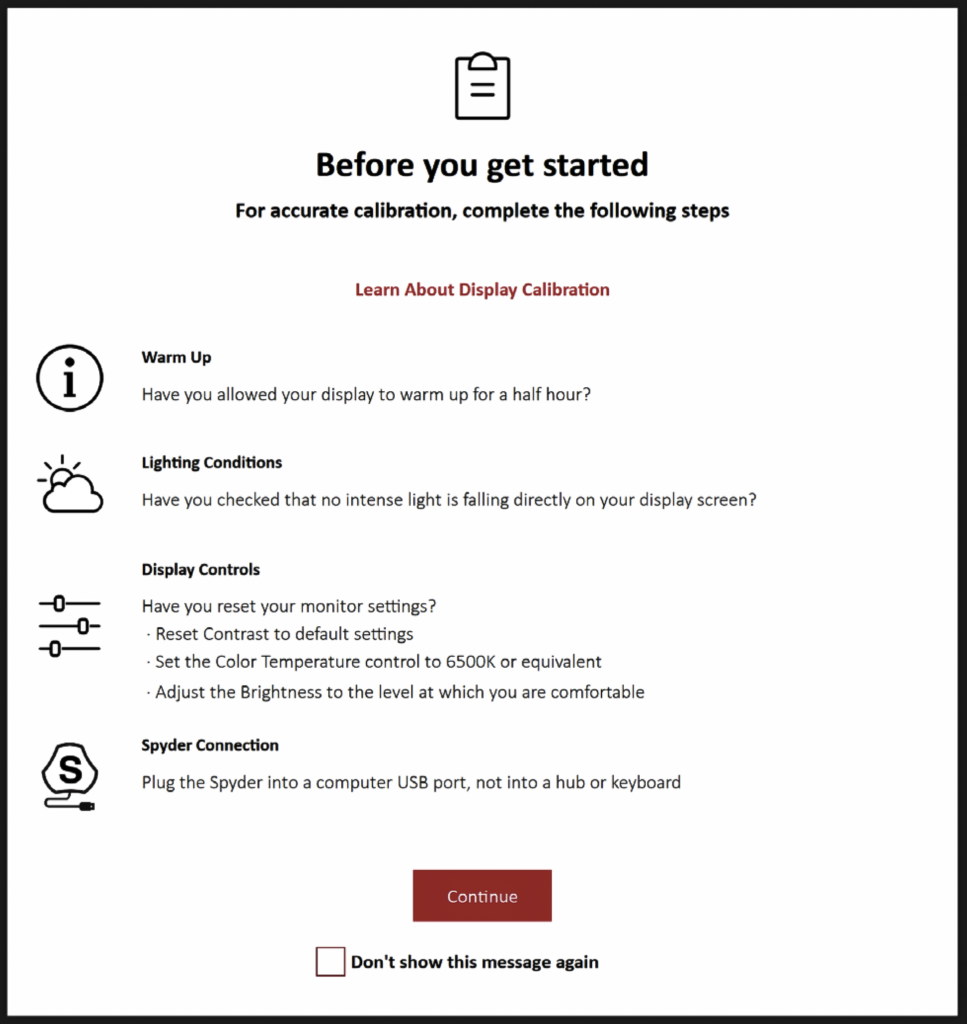
Before calibrating your monitor with the Datacolor Spyder X2 Ultra, we need to follow these simple but essential steps to ensure accurate results:
Warm Up Your Monitor: Turn on your monitor and let it warm up for at least 30 minutes before starting the calibration process. This ensures stable performance during calibration.
Lighting Conditions: Avoid direct light falling on your display. Find a location where your monitor isn’t affected by strong sunlight or glare.
For colour-critical work, it’s best to work in a dimly lit environment. Consider turning off desk lamps to minimise additional light sources.
Reset Monitor Controls: If available, reset your monitor controls (such as brightness, contrast, and colour settings) to the factory default settings. This provides a consistent starting point for calibration.
We now need to select the device/devices box to calibrate my (ASUS ProArt Display PA279CRV). The other option is Soft Proofing. I will cover this more in next months review of the Datacolor Spyder X2 Print Studio.

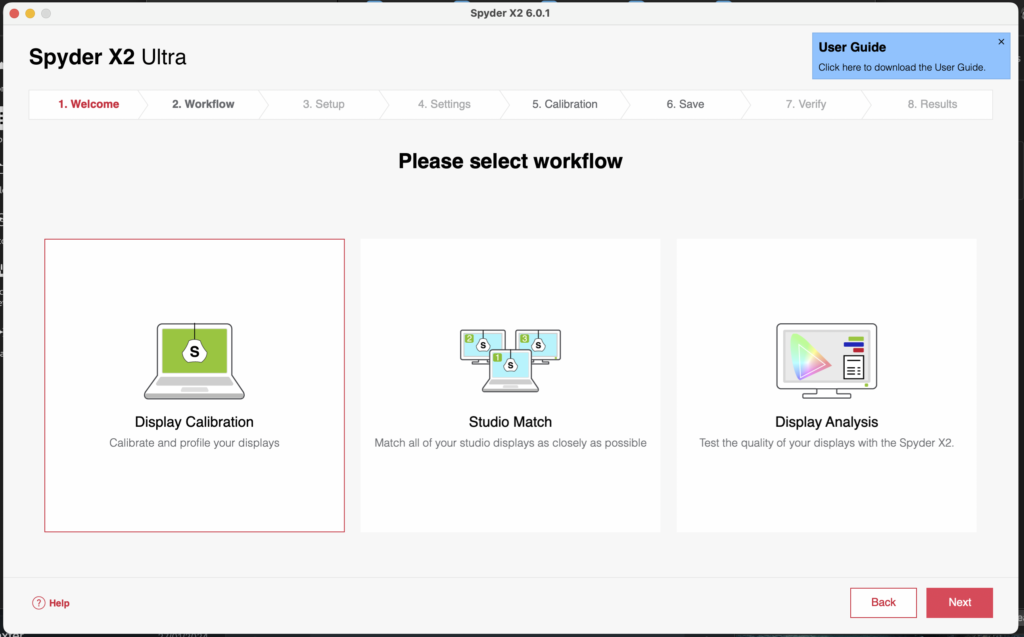
Next we select the type of workflow:
- Display Calibration
- Studio Match
- Display Analysis
I choose Display Calibration
Monitor Selection:
- I chose the ASUS ProArt Display PA279CRV for my setup.
- The software identified the correct model number
DisplayType:
- Make sure you’ve selected the correct option for your display type.
Display Settings:
- In the second column, you’ll find the default setting called Wide LED.
Depending on the type of screen technology your monitor uses, there are additional options available here.
Identify Monitor Controls:
- Finally, in the last column, the software will prompt you to identify the control options specific to your monitor.
These options are essential for calibrating your display accurately.

If this is your first time calibrating your display, the software will automatically select Full Calibration.
For subsequent calibrations, you have three options:
- FullCAL: This uses the entire sequence of patch measurements to calibrate your screen.
- ReCAL: It updates a previously created FullCAL using a subset sequence of patch measurements.
- CheckCAL: This evaluates the accuracy of your current calibration.
Settings Selection:
Choose your settings for Gamma, White Point, and Brightness from the dropdown menus. Alternatively, you can select Other to input your own values. I left these settings as default.
You also have the option to pick Target settings based on industry standards from the dropdown menu.
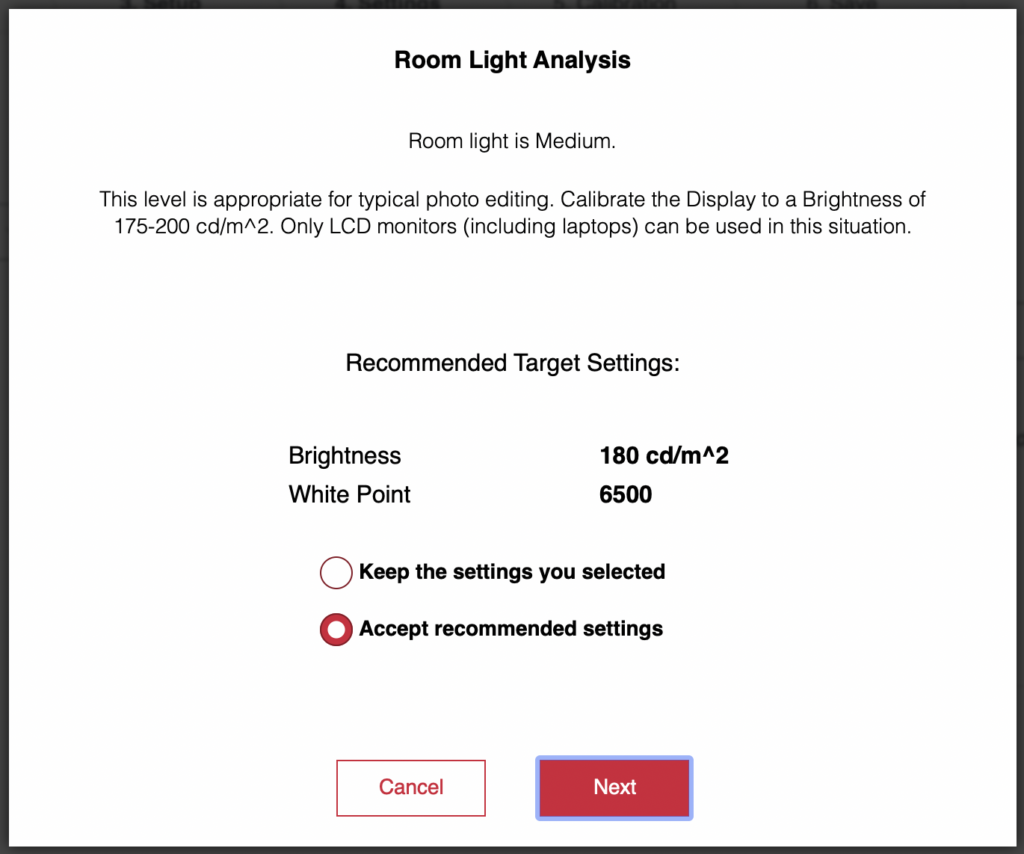
Room Light Measurement:
Next we need to measure the room light to set the display brightness correctly. If you select On, you’ll receive a notification when the room light level changes. Choosing Automatic Room Light Switching creates multiple profiles that adjust automatically based on room light changes.
Remember, both options require the Spyder X2 Ultra sensor plugged into your computer to detect light changes.
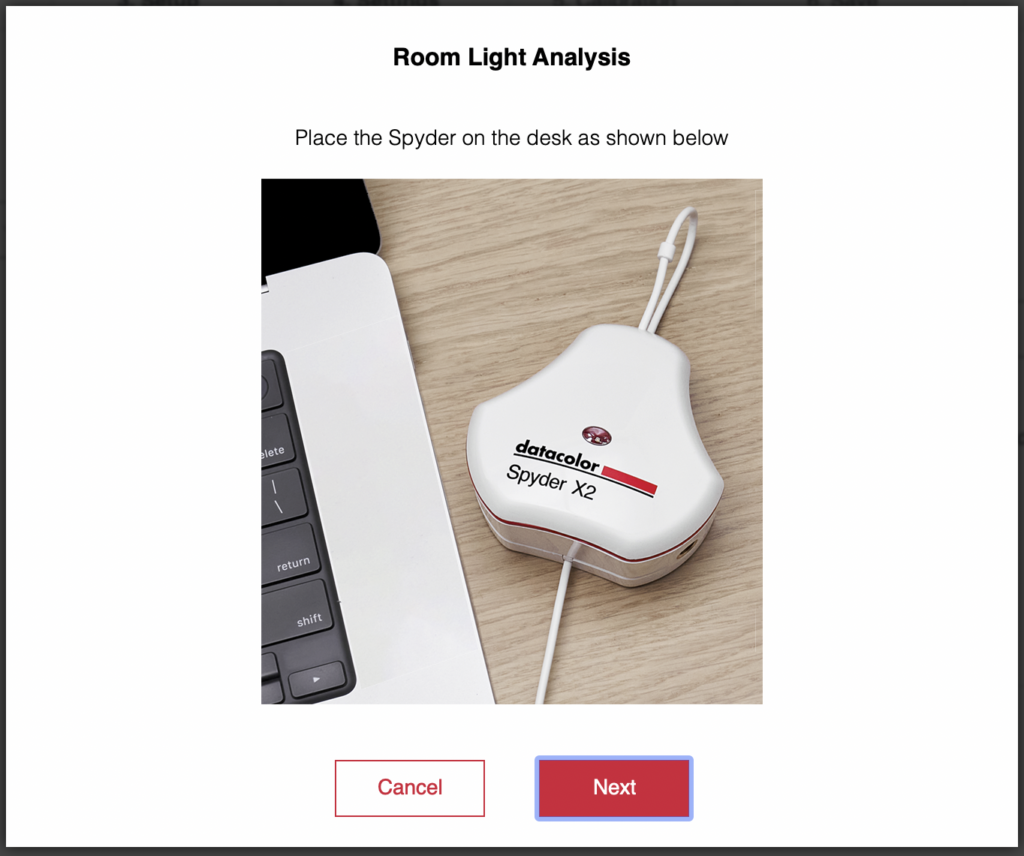
Next we need to take a reading of the ambient lighting conditions. Place the closed Spyder monitor flat on the desk next to the monitor that is be calibrated.
Monitor Calibration
Now for the exciting part, calibrating the monitor with the Datacolor Spyder X2 Ultra and eagerly anticipating the results.
Mounting the Spyder X2 Ultra:
- Follow the prompts to position your Spyder X2 Ultra on the screen.
- Remove the sensor cover: It acts as a counterweight, ensuring the calibrator stays in place and lies flat against the screen.
- Tip: Slightly tilt your display backward so that the unit rests against the screen without you needing to hold it.
Continue with Calibration:
- ClickContinue or Next. You’ll see a series of colour patches flashing on the screen.
Adjusting Display Controls (if applicable):
- If you made any adjustments during the Display Setup, the calibration process will prompt you to fine-tune your display settings.
- Follow the instructions to ensure your display falls within the recommended levels.

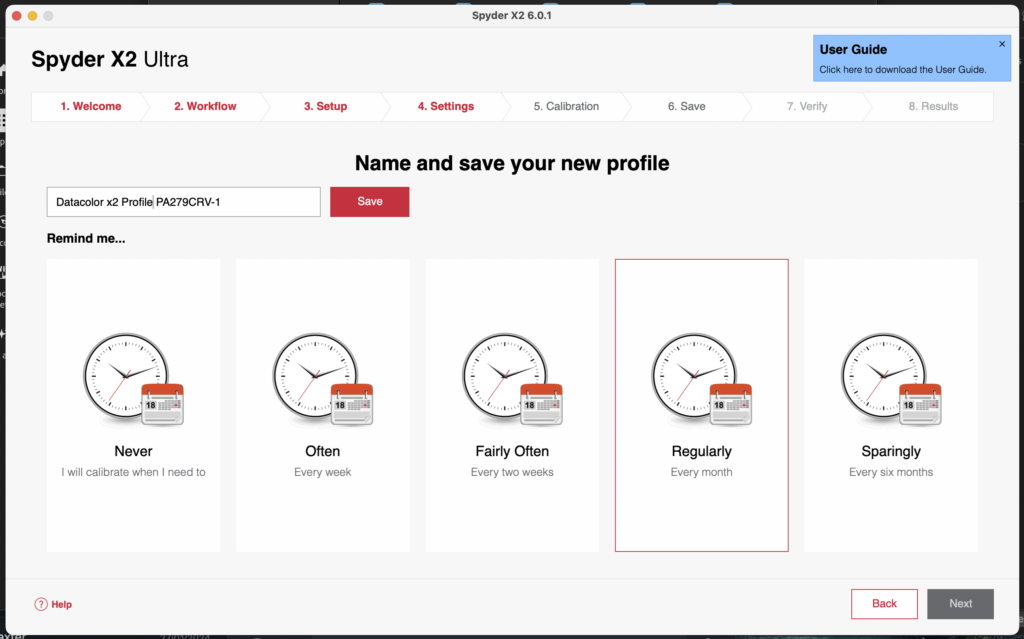
Name and Save your New Profile:
Now, you’ll be asked to name your profile. Here’s a suggested format for the filename:
- Replace Make with your monitor’s make (e.g., ASUS).
- Replace Model with your monitor’s model (e.g., ProArt Display PA279CRV).
- Replace ddmmyy(date) with today’s date (e.g., 01012024).
This helps you keep an organised archive of your monitor profiles.
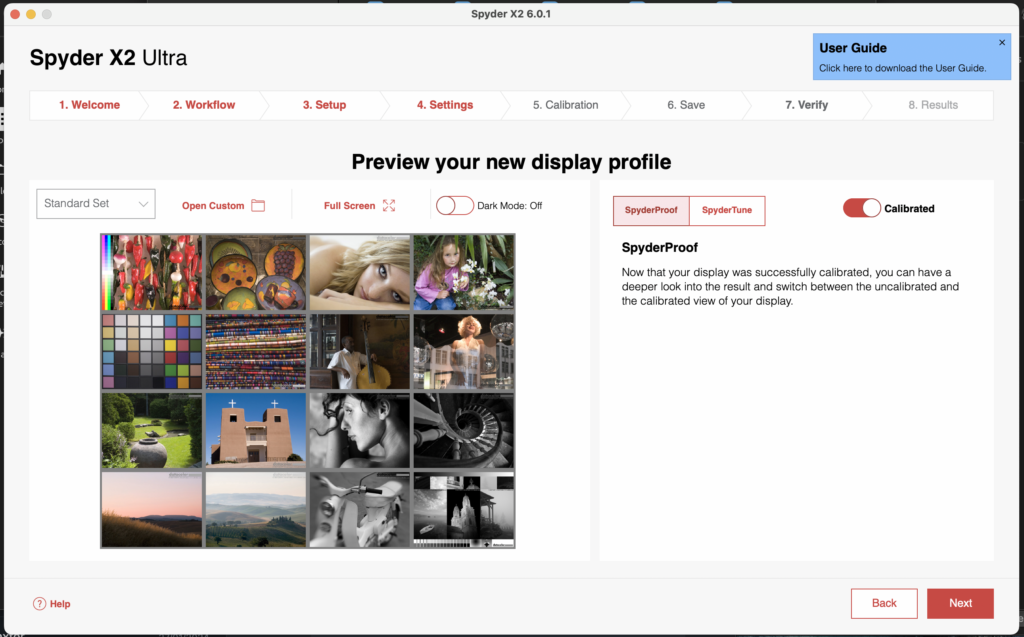
Preview your New Display Profile
Image Comparison:
- Toggle between the Calibrated and Uncalibrated views to review the calibration results.
- Click on the image to zoom in for more detail.
Custom Image Review:
- Click Open Custom to select a .tiff or .jpeg image from your computer files.
- Choose from the dropdown menu to switch between the standard set image or your custom image.
Final Steps:
- Click either SpyderTune (covered in next months review) or next to proceed with the calibration process.
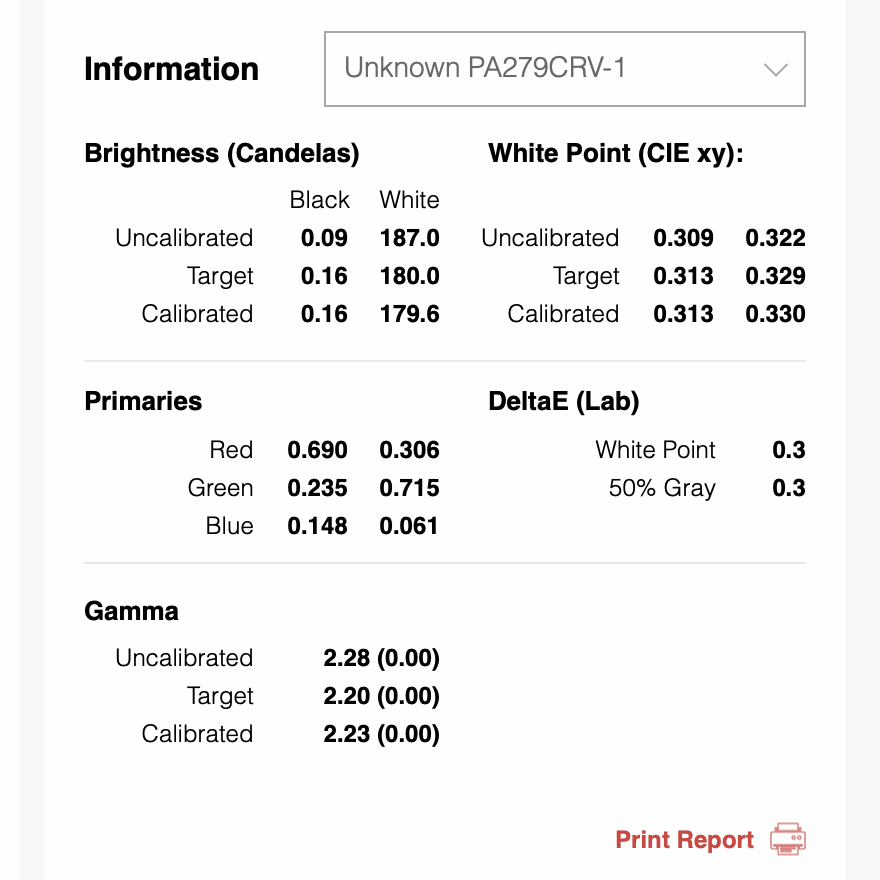
The profile overview after successful calibration are shown below, the top output is in the sRGB colourspace and the Adobe RGB colourspace.

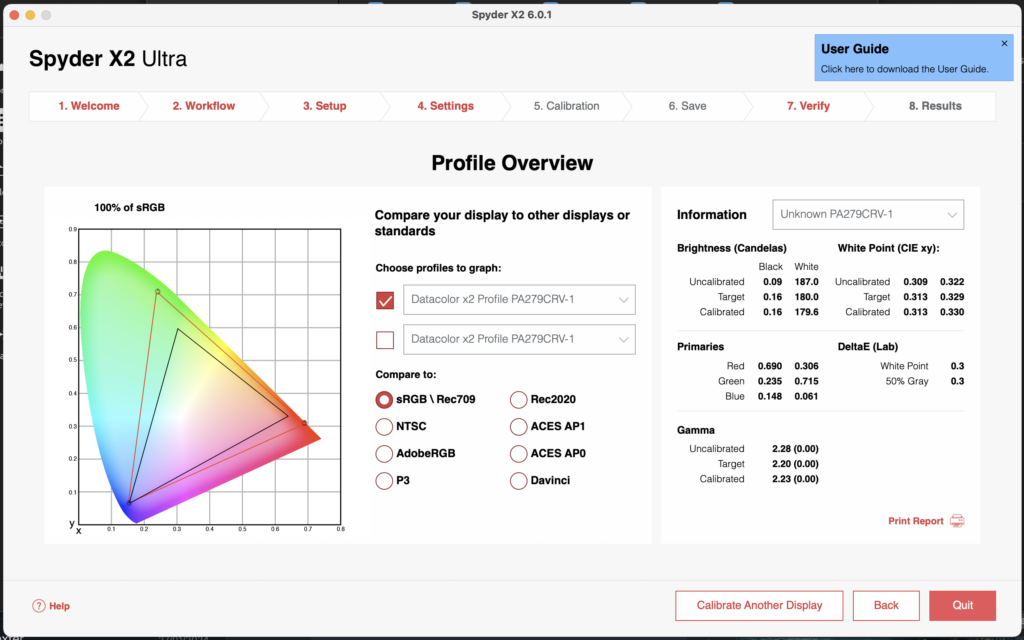
Calibration Results - Asus PA279CRV-1
I was extremely impressed with the speed and the final calibration results. The Asus PA279CRV-1 is a factory calibrated monitor. The included Calman colour calibration testing report measured the Gamma @2.29. This excellent result was improved following the Datacolor Spyder X2 Ultra calibration to an overall Gamma @2.23.
Lower Gamma (Less Than 2.2):
- Shadows appear brighter.
- Images may look flatter and washed out.
- Harder to see highlights.
Higher Gamma (Greater Than 2.2):
- Enhances contrast.
- May make details in shadows less visible.
** Gamma describes the relationship between the input signal (brightness levels) and the output luminance (brightness) of a display.
Conclusions Elevate Your Photography with Datacolor Spyder X2
In the dynamic world of photography, accurate colour representation is paramount. The Datacolor Spyder X2 Ultra emerges as a powerful ally for photographers and videographers seeking precision and consistency in their visual work. Here’s why it deserves a place in your toolkit:
- Colour Accuracy: The Spyder X2 Ultra ensures that your laptop screens and desktop monitors faithfully display images and footage. Bid farewell to colour discrepancies and embrace true-to-life hues.
- Enhanced Hardware: With an updated USB-C connector, the Spyder X2 Ultra caters to modern devices. Whether you’re editing on a laptop or a high-brightness HDR monitor, this tool adapts seamlessly.
- HDR Calibration: The Ultra version of the Spyder X2 Ultra allows profiling of displays with luminance up to 2000 nits. If you’re working with super-bright monitors for tethered shooting outdoors, this feature is invaluable.
- Speedy Calibration: The calibration process takes less than 90 seconds, freeing up your time for creative endeavours. Plus, the redesigned software provides a slick experience.
- Versatility: Whether you’re a photographer, videographer, or digital designer, the Spyder X2 Ultra caters to your needs. It’s your gateway to consistent, accurate colours across various platforms.
In summary, the Datacolor Spyder X2 Ultra isn’t just a calibration device; it’s a bridge between your creative vision and the final output. Invest in precision, elevate your work, and let your images shine with the Spyder X2 Ultra.
Next month I review the Datacolor Spyder X2 Print Studio, from camera to print, an in-depth review of Datacolor’s complete colour management system.
Stephen 🙂
Amazon Affiliate Links - Please Support Our Reviews
https://amzn.to/3tQLHGa spyder x pro
https://amzn.to/48XdvaK spyder checkr
https://amzn.to/421yNSj spyder x2 elite
https://amzn.to/4aZrQFk spyder x2 ultra
https://amzn.to/3S2wh9B Datacolor Spyder X2 Print Studio Kit: Essential photographer toolkit for precise control from recording to editing to print
https://amzn.to/3U2sOuj Datacolor Spyder X2 Photo Studio Kit
https://amzn.to/3tUUJlt Datacolor Spyder Checker Photo for Colour Accuracy & Consistency, Portable Colour Matching Tool with Ergonomic Case, 62 Colour Targets, Colour Correction Chart for Photography & Portraits
https://amzn.to/3SlDS4D datacolor Spyder X Pro: Monitor Calibration designed for serious Photographers and Designers & Datacolor Spyder Checkr24: 24 Colour Patch and Grey Card for camera calibration
Colour Management Acronyms
RGB: Red, Green, Blue – The primary colours used in digital imaging.
CMYK: Cyan, Magenta, Yellow, Black – The colour model used in colour printing.
ICC: International Colour Consortium – An organisation that establishes and maintains colour management standards.
ICC Profile: A set of data that characterises a colour input or output device, such as a monitor or printer.
sRGB: Standard Red Green Blue – A standard RGB colour space widely used for digital imaging, web, and consumer electronics.
Adobe RGB: A larger RGB colour space than sRGB, often used in professional photography for a wider gamut.
https://amzn.to/3U2sOuj Datacolor Spyder X2 Photo Studio Kit
https://amzn.to/3tUUJlt Datacolor Spyder Checker Photo for Colour Accuracy & Consistency, Portable Colour Matching Tool with Ergonomic Case, 62 Colour Targets, Colour Correction Chart for Photography & Portraits
https://amzn.to/3SlDS4D datacolor Spyder X Pro: Monitor Calibration designed for serious Photographers and Designers & Datacolor Spyder Checkr24: 24 Colour Patch and Grey Card for camera calibration

