The LaserPecker company is located in Wan Chai, China and was founded in 2017. The LaserPecker Pro was successfully crowd-funded in 2019 within 14 minutes, raising $77000+. The company has grown exponentially and continues to release new and improved models through continued investment and R&D. The company has recently launched the LaserPecker 4, featuring a dual laser head, diode and fibre in one neat package, raising a staggering 3.3 million euros via the Kickstarter campaign.LaserPecker 2.
Build Quality
There is no doubt that LaserPecker has produced a wonderfully built and designed compact laser machine. The LaserPecker 2 arrives in boxes that ooze quality, a high-end presentation that doesn’t disappoint when opened. The laser machine is packed in high-density foam for ultimate protection during shipping.
The LaserPecker 2 is built akin to a high-end mobile phone; the all-aluminium laser head unit has a good feel and weight. The laser head features a carry handle, touch controls, rear IO, integrated fan, power on indicates (x2) and DC in. The stand and base are built from aluminium, and the former has touch controls for raising/lowering the laser head. The frame incorporates a USB-C port that connects to the laser head for power. LaserPecker includes a laser light shield that attaches to the base of the laser head with three clips, sliding towards the rear of the laser head to secure it in place.
The LaserPecker 2 features a 5W 450nm NICHIA solid-state diode laser.
LaserPecker 2 – Box Contents
- LaserPecker 2 Engraver
- Laser Guard + Integral Fan
- Electric Stand
- Power Adapter
- USB Cables (x2)
- Safety Glasses
- Wooden Ruler
- Allen key and Screws
- Sample Materials (Wood, Steel Dog Tag)
- Quick Start Guide
Specifications
Power – 5W
Laser Type – 450nm NICHIA Diode Laser
Engraving Size – 100 x 2000mm
Resolution – 1K/1.3K/2K
Engraving Speed – 6mm/s-600mm/s
Preview Speed – 3750mm/s
Input – 12V 5A | 100-240V | 50-60Hz
Wireless Transmission – High-Speed Bluetooth 5.0
File Formats – JPG, SVG, PNG, BMP, G code, CAD, AI, CDR, DWG and more
Operating System – Mobile: Android & iOS, Desktop: Windows & macOS
LaserPecker 2 – Assembly
The assembly of the laserPecker 2 is straightforward, it consists of three main parts only.
- Laser Head
- Laser Stand (Electric)
- Laser Base
The base connects to the stand with two screws, and the laser head attaches to the laser stand with a large thumbwheel. The USB cables attach to the rear IO and transfer power to the electric stand. The supplied power adapter connects to the DC-in, and the protective shield is affixed to the laser head.
LaserPecker 2 Software
LaserPecker provides comprehensive engraving and cutting software for all major formats for free.
The LaserPecker App
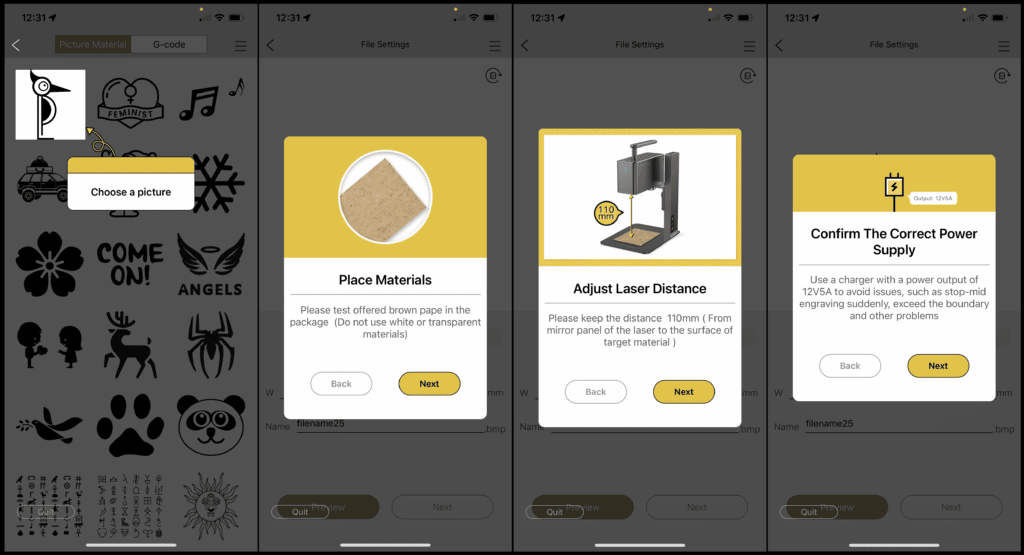
The free app supports Android and IOS and can be downloaded via the respective online stores. The app is well-designed and features a ‘newbie’ mode. The layout is simple and intuitive, and the main screen contains four (4) icons, Album, Camera, Creation and Examples.
- Album – directs the user to images stored on the local device for import.
- Camera – accesses the device’s camera to capture an image for import.
- Creation – opens drawing and text for design by the user.
- Examples – provides preinstalled icons/images and a limited selection under the G-code tab.

The navigation menu of the home screen opens a sidebar menu to access the account and other functions of the app. These include:
- Account
- Mobile Settings
- Bluetooth Device Connection
- History Documents
- Contact LaserPecker
- Version
- Service Agreement
- Newbie Guide (example below)
LaserPecker Desktop
Unfortunately, I could not connect my iMac to the LaserPecker 2. I will describe the interface and update this section later. The interface has a clean and recognisable format for those who have used Lightburn software. Tools located to the left of the main window is a menu consisting of all the main tools.

Along the top is the main menu, image manipulation tools (listed above), undo and zoom. The layers and engraving panels are located to the left of the main window. There are convenient measurements marked for the main window in millimetres.
LaserPecker 2 in Action
The LaserPecker 2 has a small footprint. The laser in its standard form has a working area of 100mm x 100mm. The laser head remains stationary whilst, in operation, the blue laser is deflected by precision mirror galvanometers that direct the beam to any angle within the marking window of the laser.
Engraving Material Test
I selected various materials to test the engraving capability of the LaserPecker 2:
- Basswood 3mm
- Leather 2mm
- Slate
- Metal Business Card (anodised)
- Glass (painted black)
- Acrylic – Black
- Cardboard
Basswood 3mm
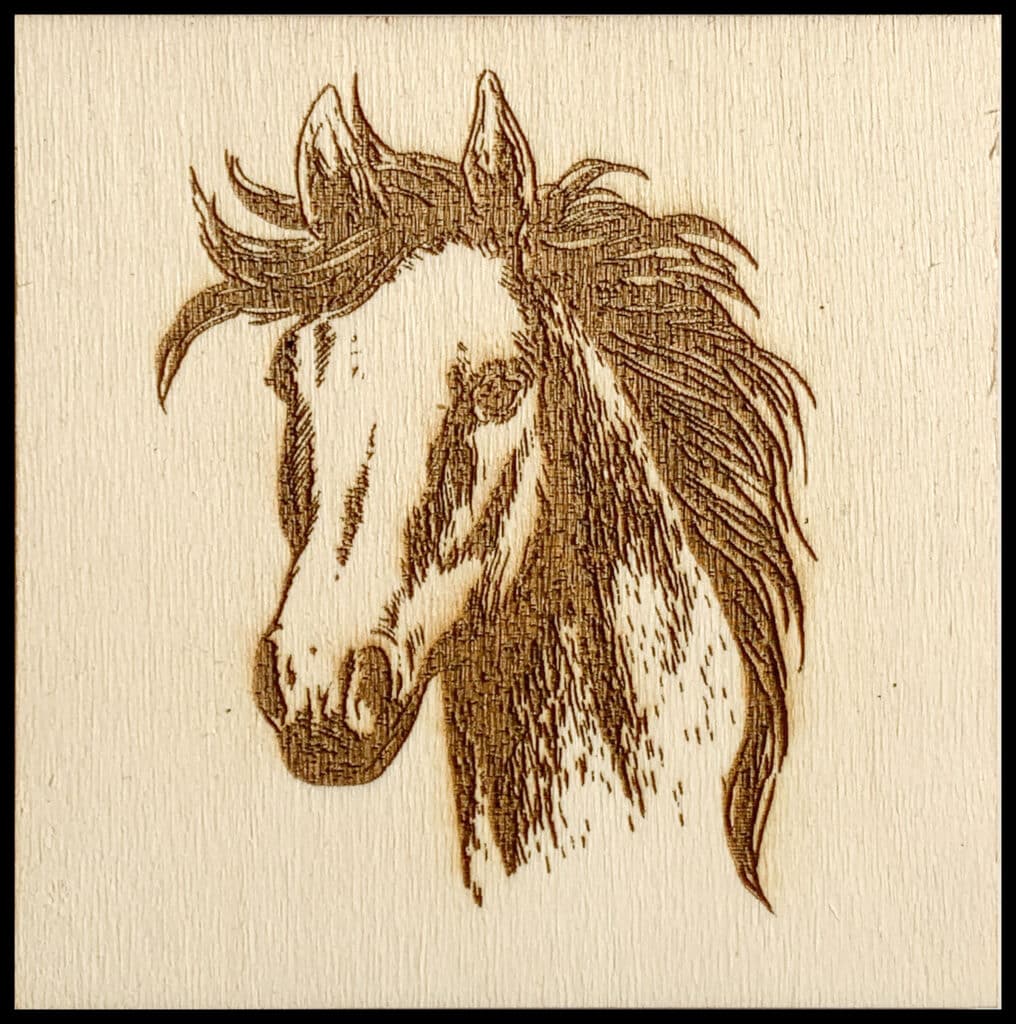
The basswood measures 100mm x 100m and is 3mm in depth. I selected the horse icon provided by LaserPecker in the IOS app.
Settings Used:
- Material: Wood
- Power: 100%
- Depth: 10%
- Pass: 1
- Time: 8.52 min
The result was outstanding, the image of the horse was beautifully rendered, being sharp (crisp) without any signs of burning.
Leather 2mm
I selected a leather swatch measuring 160 x 110mm, brown and 2mm in depth.
Settings Used:
- Material: Leather 2mm
- Power: 100%
- Depth: 8%
- Pass: 1
- Time: 5 min
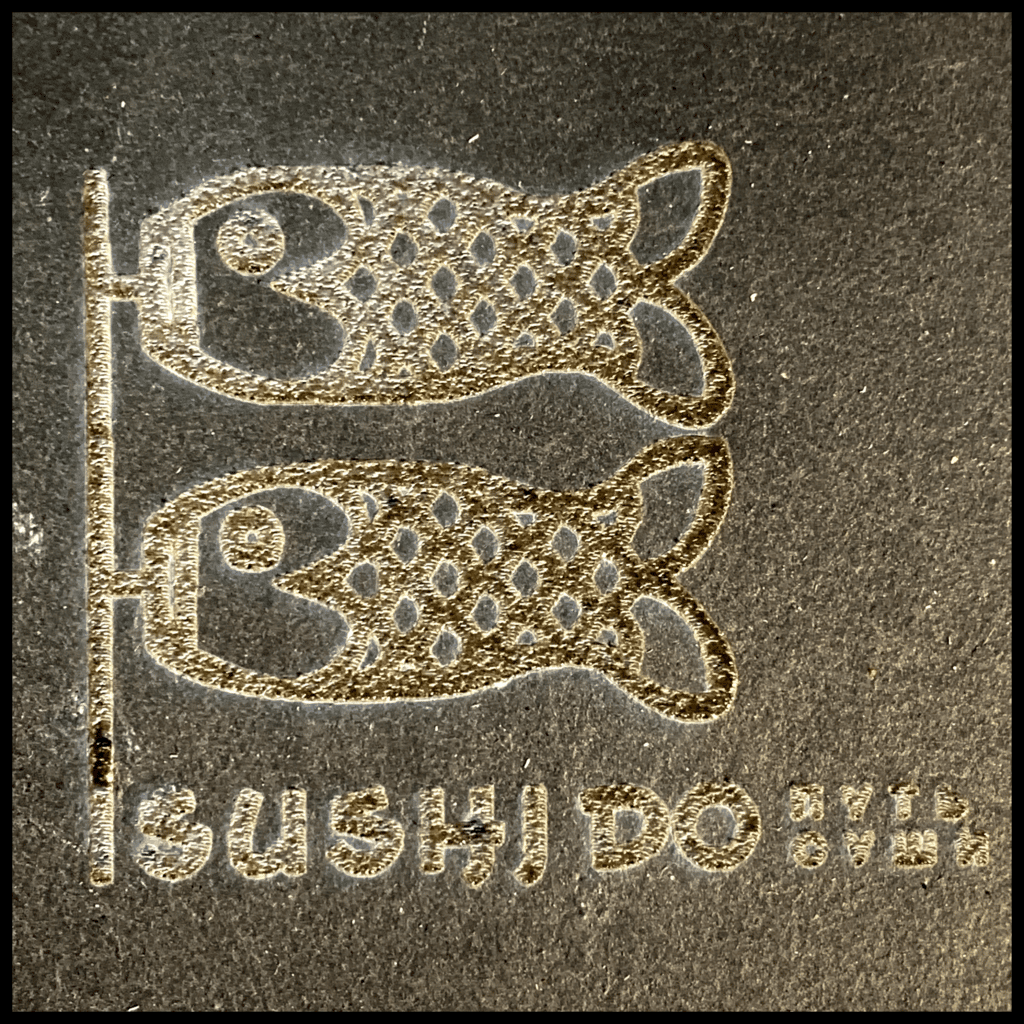
The engraving of the leather was extremely sharp and well-defined. Burning leather produces a smell that some may find unpleasant; please ensure adequate ventilation. Unfortunately, the text overran the leather’s edge. This is down to a user error (that would be me).

Slate – Stone
A grey slate coaster was selected for this engraving. It will be interesting to see if the LaserPecker 2’s 5w laser can successfully engrave stone.
Settings Used:
- Material: Leather 2mm
- Power: 100%
- Depth: 100%
- Pass: 1
- Time: 13 min
The answer to my question is yes, LaserPecker 2 can engrave slate. The results are excellent, with very sharp and clean engraving that resembles shining gold.
Metal Business Card – Anodised
The anodised business card is coated aluminium, and the card measures 85 x 55 mm. The business card is extremely thin at 0.8mm. I selected the ‘Coke Can’ setting in the IOS app.
Settings Used:
- Material: Coke Can
- Power: 100%
- Depth: 100%
- Pass: 1
- Time: 4 min
The results were superb. The image is well-defined and sharp. However, unwanted soot residues were seen on the palm trees. This is easily cleaned off with a damp cloth. The remaining soot residue could be removed with an alcohol-based cleaner. The smell generated from engraving the business card was nauseating. Please ensure you have good ventilation.

Cardboard Cutting
I selected some 270gsm cardstock for this test. I selected (card) on the material list and increased the depth to 10% instead of the 6% recommended.
Settings Used:
- Material: Card
- Power: 100%
- Depth: 10%
- Pass: 1
- Time: 4 min
The guard was removed for this test as it impedes access to the material when installed (always wear the provided safety glasses when the guard is removed). A power setting of 100% and a depth of 10% weren’t enough to cut out the bee design with one pass; a second pass and/or an increase in depth would have completely cut out the image.

LaserPecker Rotary Tool
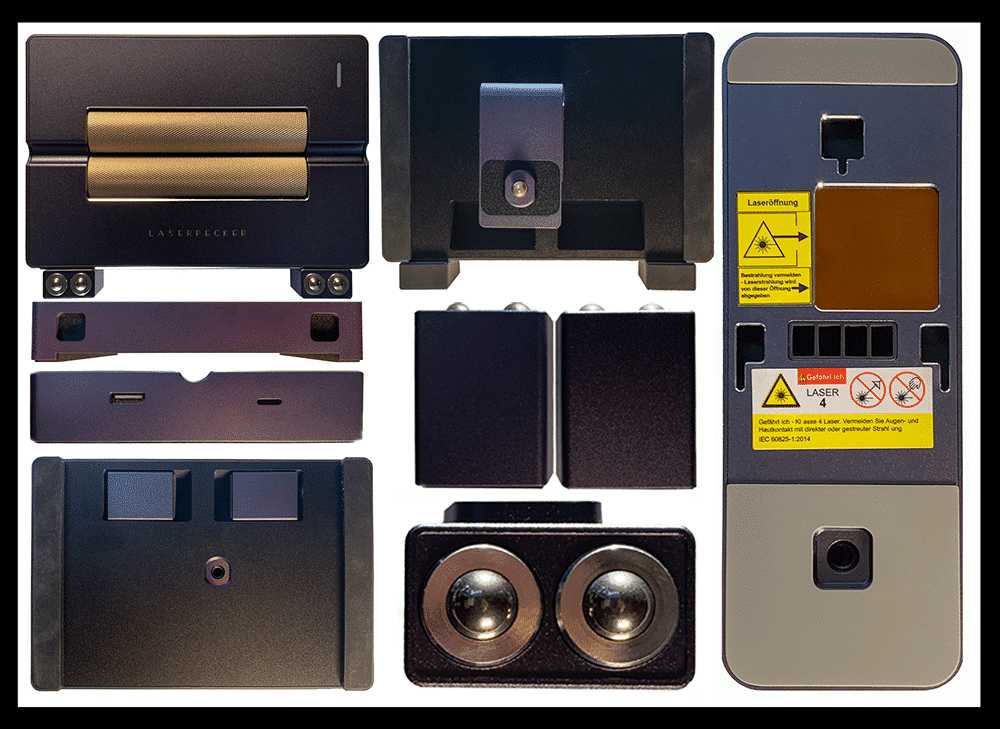
The LaserPecker rotary tool is beautifully designed and constructed; it feels solid, and the attention to detail is sublime. Designed and built from metal (aluminium and brass) oozes quality. LaserPecker includes the following accessories with the rotary tool.
- Rotary Tool
- Mounting Bracket
- USB-C Cable
- Silicone Bands
- Two Magnetic Rollers -Stored in the Base of the Rotary Tool Body
The LaserPecker rotary tool has three main modes:
- Cylinder
- Slab
- Trolly
LaserPecker has put a great deal of time and effort into the design. It can be used as a rotary tool for cylindrical objects with or without support from magnetic rollers. The rotary tool can also be used in a mode called slab, a long piece of material (supported on either side of the roller body). The material moves on the 3rd-axis powered by the revolving rollers as the laser head stays stationary. In trolly mode, the rotary tool body is inverted, and the two (2) magnetic rollers attach to the roller body. The LaserPecker laser head attaches to the provided C bracket and the roller unit’s base. This configuration allows the laser to move whilst travelling along the workpiece (like a trolly), impressive.
Cylinder Mode
The LaserPecker rotary body sits across the base of the laserPecker 2. The power is supplied via a USB A to C cable and outputted via a USB A to C cable attached to the LaserPecker stand. The laser head needs to be 110mm from the high point on the cylindrical material; in this case, it is an aluminium can. Coke cans are smooth; LaserPecker has taken this into account and supplied various sizes of silicon bands (these can be seen in the video below). The bands stretch around the can interface with the brass (knurled) rollers offering a better grip to reduce slipping. Please ensure that the third access is set in the mode tab and the image is facing in the preferred direction. Preview is available to align the image with the material, and the rollers move accordingly to demonstrate the area of engraving.
Settings Used:
- Material: Coke Can
- Power: 100%
- Depth: 20%
- Pass: 1
- Time: 6 min
I choose a Super Bowl logo to engrave, (Super Bowl Month) and the results were first-class. The detail is sharp and legible without any distortion or deviation.

Trolly Mode
The laser can be moved with the rotary tool, an inspired design concept. The laser head is removed from the stand and attached with the C bracket to the base of the rotary tool. The two (2) magnetic rollers are attached to the front of the rotary tool. The USB-A to C cable connects the power from the laser head to the roller tool (USB-C USB-A) to the laser head. Please ensure that the third axis tab is selected under the mode section and select Trolly Mode. Please see LaserPecker’s instructional video below:
I was excited to try out trolly mode as it expands the versatility of the LaserPecker 2. I selected some 6 mm basswood that is incredibly flat to ensure the laser travel wouldn’t deviate and remain parral to the basswood board. The maximum width is still restricted to 100mm, but the height can now be extended (250mm in this example).
Settings Used:
- Material: Wood
- Power: 100%
- Depth: 10%
- Pass: 1
- Time: 16 min
Eventually, I produced a totem pole in a straight line, and the results were excellent. This was achieved on my third attempt; the trolly wouldn’t keep a parallel line as it navigated backwards and became a real pain. I eventually narrowed this issue down to the power lead caused by the deviation, the weight of the cable pulled to the left. To resolve this issue, I lifted the power brick onto the same level as the table, thus negating the slight pull. I would strongly advise that trolly mode be used with the LaserPecker battery pack that rides along with the laser.

Observations and Recommendations
The LaserPecker team have built and designed a laser device that is a sublime piece of engineering. However, some issues (static laser head) restrict its versatility, especially compared to a machine with a moveable laser head within a frame. After many hours of use, these are my findings:
The touch control to raise and lower the laser head is on the side of the stand and not in direct line of sight. I suggest the controls be relocated to the front of the laser for better access.
The text in the supplied documentation is too small to read comfortably, even with glasses. The text size could be increased to enable easy reading.
The focusing arm can not be used in conjunction with the supplied guard.
Whilst using the LaserPecker application, the selected size dimensions will disappear if the laser has lost its Bluetooth connection. The correct size dimensions require re-entering after successful reconnection.
Adjusting the material placement with the guard affixed is troublesome; the guard has to be lifted first. Unfortunately, as the laser head is raised, the preview image/guide increases in size. This compromises the accurate placement of the material.
Trolly mode is inventive, adding versatility. However, it is tricky to achieve good results. The LaserPecker 2 can drift/deviate whilst travelling backwards, even on the flattest boards. I discovered that the power lead caused the laser body to drift and ruin the workpiece. The laser can not be corrected once it starts to deviate the only option is to stop and try again. I would advise that users purchase the LaserPecker battery pack that rides on the laser, thus negating the issue.
Again trolly in mode, the laser can fall off the back of the workpiece ruining the engraving. Please ensure you have a spare piece of material with the same depth at the rear to negate this issue.
The LaserPecker 2 can cut materials if required. However, it’s not its strong point increasing the number of passes introduces over-burning and charring, possibly due to the lack of air assistance.
Adequate ventilation is required when using the LaserPecker 2; the guard with the built-in extraction fan is insufficient to disperse the fumes/smoke from the work area. If used indoors, a supplementary exhaust system is required. Some materials give off very toxic fumes during the laser process and shouldn’t be breathed in. always ensure adequate ventilation.
The stationary laser head restricts the maximum engraving area to 100mm x 100mm. The working length increases in Slab and Trolly modes, but the width remains 100mm.
LaserPecker 2 Positives
- The LaserPecker 2 is well-engineered and well-built with the finest materials.
- Its small footprint takes up minimal space.
- The laser is fast and accurate, with excellent engraving on the materials tested.
- A powerful laser that produces excellent results, punching above its 5W rating.
- Mobility, the LaserPecker 2 can be used handheld to engrave vertically.
- A battery pack is available, increasing the versatility and mobility of the laser.
- The Slab and Trolly modes increase the length of the laser engraving ideal for house names, names and tall graphics.
- Preview mode is superb for lining up the material, displayed as a graphic or bounding box and indicating the centre of the design.
- The laser strength can be increased during the preview if the laser can not be seen on the material.
- Safety measures are built into the app to lock off the laser with a password and clear safety messages to ensure the user’s safety.
- A comprehensive Facebook user group to get the best out of the LaserPecker 2 https://www.facebook.com/groups/laserpecker2/
- Ease of assembly and disassembly.
- Laser engraves/cuts a wide range of materials.
- An excellent choice for a first-time laser user and home user.
- Tilt Protection.
- Overheat Protection.
- Safety guard and glasses
Conclusions
The LaserPecker 2 is an outstanding and powerful laser, especially with its 5W rating. Engravings are sharp and capture even the finest detail, burning and charring are kept to a minimum, producing excellent results. The build quality is outstanding, the Apple of the lasering world, presented in high-quality packaging that doesn’t disappoint when opened. There are negatives related to the type of laser (fixed laser head). The laser has a 100 x 100mm engraving area in the standard lasering mode, which is ideal for small projects like coasters, business cards, small wooden pieces etc. The engraving area can be extended in Trolly and Slab mode, the width remains at a maximum of 100mm, but the length can be extended. LaserPecker design engineers should be congratulated for their innovative design that improves the versatility of the LaserPecker 2 and the marvellous rotary tool. Using the inverted rotary tool to trolly the LaserPecker 2 is ingenious and shows the engineers used great skill and forethought to make the laser as versatile as possible. Some reviewers have concluded that LaserPecker 2 is a gadget rather than a serious tool; I can agree slightly with this thinking. However, there is no reason that the LaserPecker 2 couldn’t be utilised to complement a more powerful machine like the Atezr 35W. I wouldn’t use the LaserPecker 2 to cut materials (it can). There are laser machines better suited for this task. The lack of air assistance and adequate ventilation would prohibit use in an enclosed space.
Final Thoughts
LaserPecker has built a powerful fixed-head laser and designed it to be as versatile as possible, given the form factor. The LaserPecker 2 is ideal for home and small business use. I will utilise it to support my Atezr laser. It has been designed for simplicity of use. Compliment this with the free software from LaserPecker, and they have an instant hit. If you are in the market for a high-class, small footprint and portable laser, look no further than the LaserPecker 2.
Stephen
Please support us at Gaelic Memories Photography Tech Reviews, affiliate link below :
Buy: LaserPecker 2 http://bit.ly/3x4DjR7

