
Epson Surecolor P800 Review
Welcome to the October review blog, great to be back to the reviews, we have a great printer from Epson this month.
Many professional photographers including myself outsource printing, whilst convenient it’s a considerable cost to the business.
Today a large box from Epson Ireland arrived containing a SureColor SC-P800.
This is a professional A2 (16.5 x 23.4 in) printer that uses pigment-based inks perfect for archival printing.
This review will focus on setting up the printer from new and the results achieved. This is a ‘Real-World’ review, not a technical review there are many excellent in-depth technical reviews online.
I aim to illustrate how easy/difficult it is for a photographer to integrate the Epson and also you can check Epson Surecolor P800 Review into a busy workflow and the output results.
Introduction
To explain the specifications and features we have done an Epson Surecolor P800 review. The Epson SureColor P800 is a 17” (A2) professional printer and is shipped with 9 60ml ink starter cartridges. Retail cartridges come with 80ml of ink.
The printer weighs 19.5kg (42.99 pounds) and strongly advised two people to lift the printer from the shipping box, this is aided by the large plastic bag around the printer.

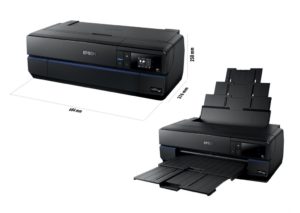
Also supplied by Epson is a roller attachment (sold separately) that sits on the rear of the printer.
Connections to the printer include 100Base-T ethernet, USB and Wi-Fi.

Located on the front of the printer is a large adjustable control panel consisting of three large buttons home, return and power; a 7cm (2.76″) colour LCD screen and finally a blue neon power light.

There are three paper trays, the back tray is used for rolled media and is also utilised when loading heavy media from the front tray. The sheet media tray is located on the top of the printer. The heavy medium tray is located above the output tray.
The closed dimensions are 250mm (H) 376mm (W) and 684mm (L)
Setting Up
The first task was locating and removing the blue tape used to secure the printer in transit. The printhead is secured with a plastic unit, pull the cord taped to the top of the printer to release the printhead carriage.
Attaching the roller is hassle-free, it’s located by two tabs and secured with two thumbscrews. I connected the printer via a USB lead.
Powering on the SC- P800 the printer welcomed me via the LCD; following the instructions I loaded the 9 cartridges, each one engaging with a positive click, and closed the cartridge panel.

Downloaded the latest drivers from Epson and my iMac software was identified correctly (Catalina 10.5). Performed a ‘Printhead Alignment’ using Epson glossy A4 media. After successfully aligning the printer head a nozzle check was completed successfully.
Time to print a test sample, I downloaded a tiff file from SAMPLE PRINT

The sample printed perfectly, the colours were bright and well saturated and the blacks were perfectly neutral. Ensure when printing the test sample not to apply any settings in the printer driver, once downloaded online just send to print.
I would strongly suggest purchasing a monitor calibrator if your workstation screen is not calibrated correctly the results might be disappointing. The Epson SureColor P800 can only print the image it receives, it’s crucial that the monitor accurately renders colours and the luminance settings are adjusted correctly.
*It’s wise never to edit in a brightly lit room the luminance of the monitor is having to compete with other light sources.
First Test Print
Opening a test photo in photoshop I selected the correct ICC profile and paper settings. The printer detects the type of media installed, this is shown on the LCD. With an A4 sheet of Epson premium gloss, I sent the image to print. The print had a magenta cast. This magenta cast was caused by double profiling, both Photoshop and the Epson printer were applying colour management.
Having researched the reason for a magenta cast I discovered that I had installed the Air Print driver and colour management, colour and colour fine were unavailable. When installing the Epson driver it defaulted to the Air Print. I corrected this by uninstalling the driver and reinstalling the full driver. Colour management for the printer could be disabled, allowing Photoshop to control the colour.
The second test print was stunning, the colours were vibrant and closely matched my onscreen photo. Remember the printed image will never exactly match the onscreen image as the monitor is backlit.
I decided to load some heavy fine art paper via the manual feed tray at the front of the printer. Pressing firmly the tray released with a distinctive ‘clunk’. I selected a sheet of A2 ‘Museum Heritage’ from Marrutt 310gsm a beautiful, heavy fine art textured paper.
Following the instructions on the LCD, I opened the rear tray and extended the paper support, guiding the paper slowly into the manual tray ensuring that its sitting square and not askew. The paper was identified as ‘Velvet Fine Art’, pressing the ‘Load Paper’ on the LCD the paper loaded perfectly.
Finally, I sent the image to the printer and waited.

After a few clunks and clicks the image starts printing, the noise is not intrusive and never exceeded 50db. Slowly but surely the print emerged from the printer, the image below clearly demonstrates the stunning vibrancy and accuracy of the printer. The amazing colours were faithfully reproduced and closely matched the image displayed on the monitor.

Noise
The printer makes various noises in operation these never exceeded 50db in a room with a back noise level of 30db.
Roll Media Printing
Having opened the rear tray and guiding the paper into the printer, it automatically guides the paper in after three seconds.
Selecting a panoramic print, I changed the media in the driver to roll and the ICC profile to Satin and sent the file to the printer.
The printer then proceeded to change the ‘Matt Black’ to ‘Photo Black’, purging the Matt Black ink from the delivery pipe and printer head. The automated (manual selection is available) procedure does waste ink, however, it ensures the correct inks are used, and deep blacks are beautifully rendered.

When finished the printer LCD will prompt you to either:
Cut – The printer will forward the print and a cut line printed across the paper
Cut and Eject – The printer will forward the print and a cut line printed across the paper, once cut the paper will be ejected at the rear of the printer
Eject – The paper will be ejected at the rear of the printer
Maintenance Ink Cartridge
There is a removable ink reservoir on the front of the printer, located on the lower right. This is a large collection cartridge that absorbs wasted ink in wadding, being removable saves time and expense of having to return the printer for service.

Summary
The Epson SureColor P800 is a well-designed high-quality printer, that is capable of producing simply breathtaking prints. Colours are bright and well saturated with sublime colour gradients; the printer shines in the ability to produce excellent grey tonality and blackest of blacks. I have no hesitation in recommending the Epson SureColor P800, I’m confident it will exceed your expectations, this from a photographer where details matter.
November review blog will include a more in-depth look at ICC profiles, and further testing of the superb Epson SC-P800 with a variety of fine art papers from Hahnemuhle, Canson, Marrutt, Epson and Permajet.
Conclusions
Can photographers print their work with stunning results, the answer is a resounding yes, with the caveat that time is taken to follow a few simple steps.
There is a learning curve and there were a few frustrations along the way. My advice is to research photographic printing, watch several ‘Youtube videos and don’t rush to print the first photograph. Slow and steady will win the race. Below I have detailed some links that you may find useful. Any questions or queries please leave a comment below.
Stephen 🙂
SureColor P800 Roll Media Adaptor
*I may earn a small commission from these links. Your purchase helps support our website. Thank You


